わんぱく Flutter! 第七回 syncfusion_flutter_gauges で二酸化炭素濃度測定機を Modify するっ!

前回の「わんぱく Flutter! 第六回 iBeacon で二酸化炭素測定っ!」では、iBeacon から送信された値を Flutter で表示させました。そのままでも、特に問題はありませんが、Flutter の特徴である見栄えのする UI(User Interface)でかっこよく Modify してみましょう。syncfusion_flutter_guages パッケージを使うので、簡単です。
a-software-resources.hatenablog.com
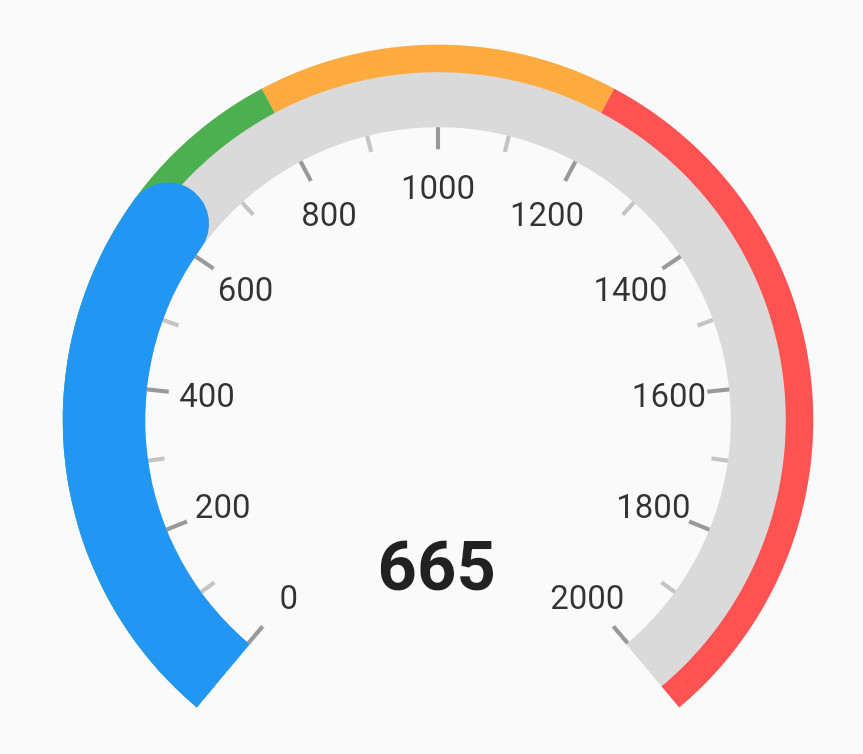
こんなゲージを追加します。
1. パッケージをインストールする
いつものように、syncfusion_flutter_gauges パッケージをインストールしましょう。しかし、今回は、pub get コマンドの代わりに、pub add コマンドを使ってみます。前回作成した iBeacon のプロジェクトのディレクトリに移動してから、以下のコマンドを実行します。
flutter pub add syncfusion_flutter_gauges
すると、これまで pubspec.yaml を編集してから pub get していたパッケージが、最新版が自動的にインストールされ、pubspec.yaml にも追加されます。
dependencies:
  flutter:
    sdk: flutter


  # The following adds the Cupertino Icons font to your application.
  # Use with the CupertinoIcons class for iOS style icons.
  cupertino_icons: ^1.0.2
  flutter_blue_beacon: ^0.0.2
  flutter_blue: ^0.5.0
  syncfusion_flutter_gauges: ^19.1.63
2. ソースコードを修正する
修正箇所は大きく分けて、三箇所ほどです。ひとつは、import に syncfusion_flutter_gauges を追加することと、Widget build() メソッドに、ゲージ Widget の追加、そして、setState() に現在の測定値と、針の色情報を追加することです。
import 'package:syncfusion_flutter_gauges/gauges.dart';
・
・
・
class _MyHomePageState extends State<MyHomePage> {
  double _counter = 0;
  Color c = Colors.blue;
  String message = 'starting...';
import でパッケージを読み込んで、針の色情報である "c" を初期値「青」で宣言しておきます。測定値は、プロジェクトが作成された時に自動的に生成されたサンプルコードにある "_counter" を使用してしまいます。ここでは、"0" で初期化しました。
追加する Widget は、このように始まります。
body: OrientationBuilder(
  builder: (context, orientation) {
    return GridView.count(
          // Create a grid with 2 columns in portrait mode, or 3 columns in
          // landscape mode.
          crossAxisCount: orientation == Orientation.portrait ? 1 : 2,
          //mainAxisSpacing: 20,
          childAspectRatio: 1.2,
今回は、画面を横にした際(Landscape mode)も考慮しているので、レイアウトは Center() と Column() ではなく、OrientationBuilder() と GridView() を使用します。これまで Center と Column() で書いていた部分を、こちらに置き換えます。OrientationBuilder() と GridView() を組み合わせると、画面が縦(Portrait mode)の際と、横の際とで変更することができます。このコードでは、"crossAxisCount:" の部分で指定していますが、"orientation == Orientation.portrait ? 1:2" とすることで、縦の時は一列、それ以外(横)の時はニ列になります。
GridView() は Widgets をグリッド状、つまり、升目状に配置するレイアウトです。写真などを画面に並べる際によく見かけるレイアウトです。そして、このレイアウトで画面が縦の時は一列、横の時は二列にします。また、"childAspectRatio:1.2" として、マス目の縦横比を 1.2、つまり、横長の長方形にしています。
      children: <Widget>[
        Container(
            decoration: BoxDecoration(
              borderRadius: BorderRadius.circular(8),
            ),
            margin: EdgeInsets.only(top: 40),
            child:SfRadialGauge(
                axes: <RadialAxis>[
                  RadialAxis(minimum: 0, maximum: 2000,
                      ranges: <GaugeRange>[
                        GaugeRange(startValue: 0, endValue: 800, color:Colors.green),
                        GaugeRange(startValue: 800,endValue: 1200,color: Colors.orangeAccent),
                        GaugeRange(startValue: 1200,endValue: 2000,color: Colors.redAccent)],
                      axisLineStyle: AxisLineStyle(thickness: 30),
                      pointers: <GaugePointer>[RangePointer(value: _counter,
                          width: 30, color: c,
                          enableAnimation: true,
                          cornerStyle: CornerStyle.endCurve)],
                      annotations: <GaugeAnnotation>[
                        GaugeAnnotation(widget: Container(child:
                        Text("${_counter.toInt()}",
                            style: TextStyle(fontSize: 25,fontWeight: FontWeight.bold))),
                            angle: 90, positionFactor: 0.5
                        )]
                  )
        ])
        ),
レイアウトを指定したので、次に、Widget を配置します。GridView() の子Widget を "children[]" で複数指定していきます。 Container() で囲まれた SfRadialGauge() というのが、今回追加しているゲージ Widget です。
"RadialAxis(minimum: 0, maximum: 2000" で、ゲージの最小値と最大値、"GaugeRange(startValue: 0, endValue: 800, color: Colors.green)" で、ゲージの目盛り 0〜800 までの色を指定しています。figure 01 と見比べると一目瞭然ですが、0〜800までは、緑色のゲージになります。同じように、800〜1200、1200〜2000 までの色も指定します。
"axisLinesStyle: AxisLinesStyle(thickness: 30)" とすることで、ゲージの太さを 30 にしています。
"pointers:" という部分が、針です。針の種類に "RangePointer" を使用し、測定値を "_counter" 変数に入れて指定します。"with: 30" は、針の太さが 30、"color: c" というのは、針の色です。針の色は、ゲージの色に合わせて変化するように変数 "c" に入れて setState() 内で設定します。
"enableAnimation: true" は、ゲージが動くことを許可し、"cornerStyle: CornerStyle.endCurve" とすることで、針の形状に丸みを付けています。
"annotations:" では、ゲージ中央に表示する数値を Text() Widget に入れて設定しています。そう、とれと Container() の "margin: EdgeInsets.only(top: 40)" では、上に 40 の余白を追加しています。
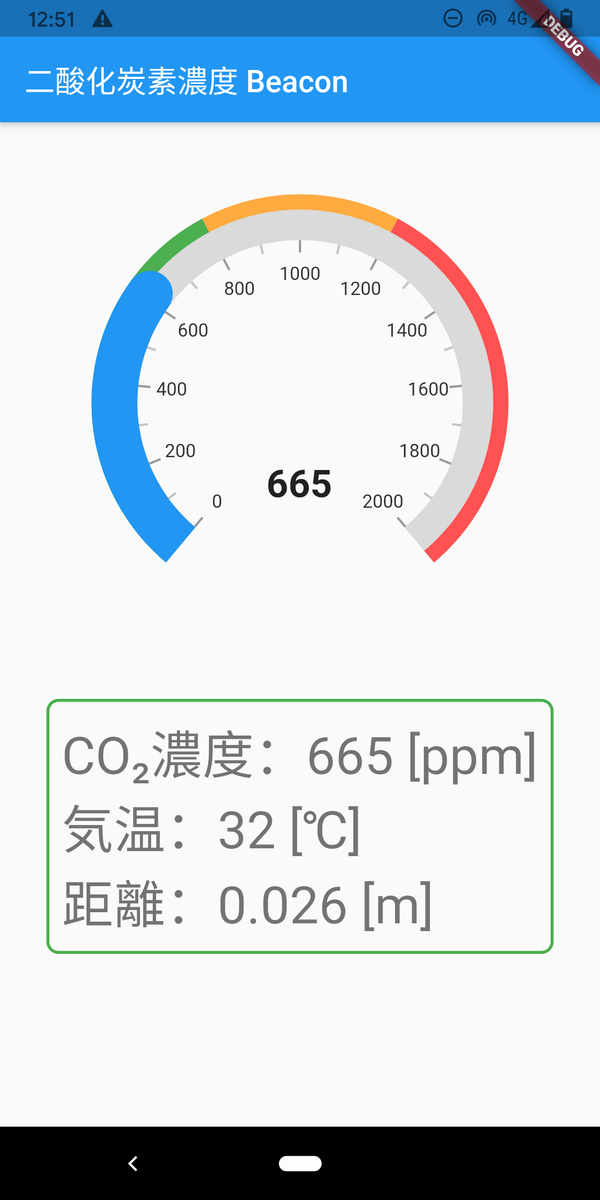
これで、figure 01 のゲージが表示されます。後は、測定値が更新された際に再描画されるように setState() 内で変化した値を設定するだけです。
setState(() {

  if(co2 <= 800){
    c = Colors.blue;
  }else if(co2 <= 1200){
    c = Colors.yellow;
  }else{
    c = Colors.red;
  }

  _counter = co2;
  beacons[beacon.hash] = beacon;
});
先程、針の色を、ゲージの色に合わせて変化させると書いた通り、"co2" の値によって、青〜黄色〜赤と、針の色も変更します。"_counter = co2" は、針の値です。
以下に全コードを示します。
import 'package:flutter/material.dart';

import 'dart:async';
import 'package:flutter_blue/flutter_blue.dart';
import 'package:flutter_blue_beacon/flutter_blue_beacon.dart';
import 'package:syncfusion_flutter_gauges/gauges.dart';

void main() {
  runApp(MyApp());
}

class MyApp extends StatelessWidget {
  // This widget is the root of your application.
  @override
  Widget build(BuildContext context) {
    return MaterialApp(
      title: '二酸化炭素濃度 Beacon',
      theme: ThemeData(
        // This is the theme of your application.
        //
        // Try running your application with "flutter run". You'll see the
        // application has a blue toolbar. Then, without quitting the app, try
        // changing the primarySwatch below to Colors.green and then invoke
        // "hot reload" (press "r" in the console where you ran "flutter run",
        // or simply save your changes to "hot reload" in a Flutter IDE).
        // Notice that the counter didn't reset back to zero; the application
        // is not restarted.
        primarySwatch: Colors.blue,
      ),
      home: MyHomePage(title: '二酸化炭素濃度 Beacon'),
    );
  }
}

class MyHomePage extends StatefulWidget {
  MyHomePage({Key key, this.title}) : super(key: key);

  // This widget is the home page of your application. It is stateful, meaning
  // that it has a State object (defined below) that contains fields that affect
  // how it looks.

  // This class is the configuration for the state. It holds the values (in this
  // case the title) provided by the parent (in this case the App widget) and
  // used by the build method of the State. Fields in a Widget subclass are
  // always marked "final".

  final String title;

  @override
  _MyHomePageState createState() => _MyHomePageState();
}

class _MyHomePageState extends State<MyHomePage> {
  double _counter = 0;
  Color c = Colors.blue;
  String message = 'starting...';

  FlutterBlueBeacon flutterBlueBeacon = FlutterBlueBeacon.instance;
  FlutterBlue _flutterBlue = FlutterBlue.instance;
  IBeacon iBeacon;

  StreamSubscription _scanSubscription;
  Map<int, Beacon> beacons = new Map();
  bool isScanning = false;

  StreamSubscription _stateSubscription;
  BluetoothState state = BluetoothState.unknown;

  @override
  void initState() {

    super.initState();

    _flutterBlue.state.then((s) {
      setState(() {
        state = s;
      });
    });

    _stateSubscription = _flutterBlue.onStateChanged().listen((s) {
      setState(() {
        state = s;
      });
    });

    _startScan();
  }

  _startScan() {
    IBeacon ib;
    double temp;
    double pres;
    double dist;
    double co2;

    print("Scanning now");
    _scanSubscription = flutterBlueBeacon
        .scan()
        .listen((beacon) {
      print('localName: ${beacon.scanResult.advertisementData.localName}');
      print('manufacturerData: ${beacon.scanResult.advertisementData.manufacturerData}');
      print('serviceData: ${beacon.scanResult.advertisementData.serviceData}');
      print('tx: ${beacon.tx}');
      print('rssi: ${beacon.rssi}');
      print('distance: ${beacon.distance}');

      ib = beacon;

      if(ib.uuid == "df19e9a46f0d4c4aa104e7ddd31a4ab5") {
        print('uuid: ${ib.uuid}');
        print('major: ${ib.major}');
        print('minor: ${ib.minor}');
        print('rssi: ${ib.rssi}');
        print('distance: ${ib.distance}');

        temp = (ib.major).toDouble();
        co2 = (ib.minor).toDouble();
        dist = (ib.distance * 1000).toInt() / 1000;

        message = "CO₂濃度:${co2.toInt()} [ppm]\n気温:${temp.toInt()} [℃]\n距離:${dist} [m]";
      }

      setState(() {

        if(co2 <= 800){
          c = Colors.blue;
        }else if(co2 <= 1200){
          c = Colors.yellow;
        }else{
          c = Colors.red;
        }

        _counter = co2;
        beacons[beacon.hash] = beacon;
      });
    });

  }

  @override
  Widget build(BuildContext context) {
    // This method is rerun every time setState is called, for instance as done
    // by the _incrementCounter method above.
    //
    // The Flutter framework has been optimized to make rerunning build methods
    // fast, so that you can just rebuild anything that needs updating rather
    // than having to individually change instances of widgets.
    return Scaffold(
      appBar: AppBar(
        // Here we take the value from the MyHomePage object that was created by
        // the App.build method, and use it to set our appbar title.
        title: Text(widget.title),
      ),
      body: OrientationBuilder(
        builder: (context, orientation) {
          return GridView.count(
                // Create a grid with 2 columns in portrait mode, or 3 columns in
                // landscape mode.
                crossAxisCount: orientation == Orientation.portrait ? 1 : 2,
                childAspectRatio: 1.2,
            children: <Widget>[
              Container(
                  decoration: BoxDecoration(
                    borderRadius: BorderRadius.circular(8),
                  ),
                  margin: EdgeInsets.only(top: 40),
                  child:SfRadialGauge(
                      axes: <RadialAxis>[
                        RadialAxis(minimum: 0, maximum: 2000,
                            ranges: <GaugeRange>[
                              GaugeRange(startValue: 0, endValue: 800, color:Colors.green),
                              GaugeRange(startValue: 800,endValue: 1200,color: Colors.orangeAccent),
                              GaugeRange(startValue: 1200,endValue: 2000,color: Colors.redAccent)],
                            axisLineStyle: AxisLineStyle(thickness: 30),
                            pointers: <GaugePointer>[RangePointer(value: _counter,
                                width: 30, color: c,
                                enableAnimation: true,
                                cornerStyle: CornerStyle.endCurve)],
                            annotations: <GaugeAnnotation>[
                              GaugeAnnotation(widget: Container(child:
                              Text("${_counter.toInt()}",
                                  style: TextStyle(fontSize: 25,fontWeight: FontWeight.bold))),
                                  angle: 90, positionFactor: 0.5
                              )]
                        )
                   ])
              ),

              Center(child:Container(
                decoration: BoxDecoration(
                  border: Border.all(color: Colors.green, width: 2),
                  borderRadius: BorderRadius.circular(8),
                ),
                padding: EdgeInsets.all(8),
                margin: EdgeInsets.only(bottom: 60),
                child: Text(
                  message,
                  style: Theme.of(context).textTheme.headline4,
                ),
              )),
            ],
          );
        }
      )
    );
  }
}
基本的に、ゲージの Widget を追加しただけです。それでは、実行してみましょう。
上手く表示できたでしょうか。今回は、OrientationBuilder() を使用しているので、横向きもあります。

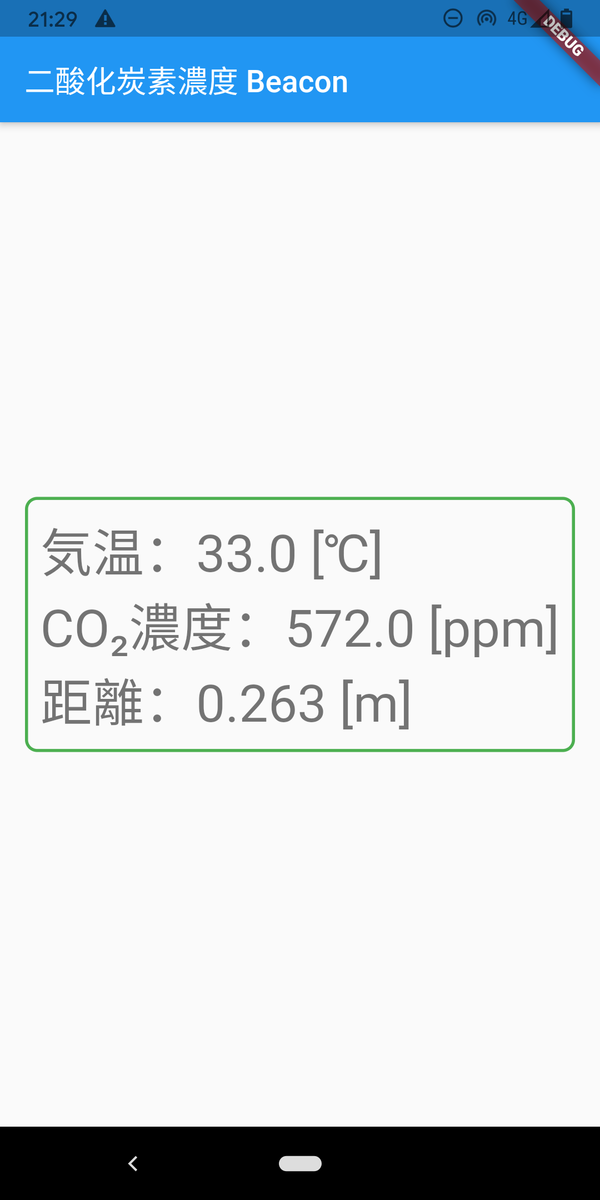
これは、数値が高い場合の表示となっており、針の色も変わっていることが確認できます。
以上
わんぱく Flutter! 第六回 iBeacon で二酸化炭素測定っ!
今回は、iBeacon の二酸化炭素濃度測定機を読み取ります。測定機も、市販のものではなく、この為に MH-Z19C センサーを用いた専用のハードウェアを作成します。センサー側の解説は、下記ウェブサイト(こちらのウェブサイトは、このウェブサイトと連携しており、同じく私が書いています)から、お読み下さい。順番としては、ハードウェア作成が先になりますが、こちらの Flutter の解説を読んでからでも構いません。

1. デフォルトプロジェクトの作成
いつものように、まず、デフォルトの Flutter プロジェクトを作成します。

2. パッケージの設定
今回は、flutter_blue_beacon パッケージと、flutter_blue パッケージを利用します。 下記のように pubspec.yaml にこの 2つを追加して、pub get します。
dependencies:
  flutter:
    sdk: flutter


  # The following adds the Cupertino Icons font to your application.
  # Use with the CupertinoIcons class for iOS style icons.
  cupertino_icons: ^1.0.2
  flutter_blue_beacon: ^0.0.2
  flutter_blue: ^0.5.0
このパッケージは、minSdkVersion が 19 以上となっているので、app レベルの build.grade の minSdkVersion を 19 に変更しておきます。そして、今回は targetSdkVersion を 28 として作成します。同様に、compileSdkVersion も 28 に変更します。
android {
    compileSdkVersion 28

    defaultConfig {
        // TODO: Specify your own unique Application ID (https://developer.android.com/studio/build/application-id.html).
        applicationId "systemquality.flutter_ibeacon"
        minSdkVersion 19
        targetSdkVersion 28
        versionCode flutterVersionCode.toInteger()
        versionName flutterVersionName
    }
また、プロジェクトを build してみると、"protobuf" 関連でエラーとなる為、プロジェクトレベルの build.grade に protobuf 関連 classpath を一つ追記しておきます。
buildscript {
    repositories {
        google()
        jcenter()
    }

    dependencies {
        classpath 'com.android.tools.build:gradle:4.1.0'
    }

    dependencies {
        classpath 'com.google.protobuf:protobuf-gradle-plugin:0.8.13' // <== これです。
    }
}
3. プログラムの作成
今回も、デフォルトで作成された main.dart を修正する形で開発します。 やはり、さほど大きくはなりませんので、以下に main.dart 全文を記載します。
import 'package:flutter/material.dart';

import 'dart:async';                                       // <== この3行を追加
import 'package:flutter_blue/flutter_blue.dart';
import 'package:flutter_blue_beacon/flutter_blue_beacon.dart';

void main() {
  runApp(MyApp());
}

class MyApp extends StatelessWidget {
  // This widget is the root of your application.
  @override
  Widget build(BuildContext context) {
    return MaterialApp(
      title: '二酸化炭素濃度 Beacon',                         // <== Title を変更
      theme: ThemeData(
        // This is the theme of your application.
        //
        // Try running your application with "flutter run". You'll see the
        // application has a blue toolbar. Then, without quitting the app, try
        // changing the primarySwatch below to Colors.green and then invoke
        // "hot reload" (press "r" in the console where you ran "flutter run",
        // or simply save your changes to "hot reload" in a Flutter IDE).
        // Notice that the counter didn't reset back to zero; the application
        // is not restarted.
        primarySwatch: Colors.blue,
      ),
      home: MyHomePage(title: '二酸化炭素濃度 Beacon'),        // <== Title を変更
    );
  }
}

class MyHomePage extends StatefulWidget {
  MyHomePage({Key key, this.title}) : super(key: key);

  // This widget is the home page of your application. It is stateful, meaning
  // that it has a State object (defined below) that contains fields that affect
  // how it looks.

  // This class is the configuration for the state. It holds the values (in this
  // case the title) provided by the parent (in this case the App widget) and
  // used by the build method of the State. Fields in a Widget subclass are
  // always marked "final".

  final String title;

  @override
  _MyHomePageState createState() => _MyHomePageState();
}

class _MyHomePageState extends State<MyHomePage> {

  String message = 'starting...';               // <== ここから initState() まで追加

  FlutterBlueBeacon flutterBlueBeacon = FlutterBlueBeacon.instance;
  FlutterBlue _flutterBlue = FlutterBlue.instance;
  IBeacon iBeacon;

  StreamSubscription _scanSubscription;
  Map<int, Beacon> beacons = new Map();

  BluetoothState state = BluetoothState.unknown;

  @override
  void initState() {                            // <== initState() 追加
    super.initState();

    _flutterBlue.state.then((s) {
      setState(() {
        state = s;
      });
    });

    _stateSubscription = _flutterBlue.onStateChanged().listen((s) {
      setState(() {
        state = s;
      });
    });

    _startScan();
  }

  _startScan() {                                // <== _startScan() 追加
    IBeacon ib;
    double temp;
    double dist;
    double co2;

    print("Scanning now");
    _scanSubscription = flutterBlueBeacon
        .scan()
        .listen((beacon) {
      print('localName: ${beacon.scanResult.advertisementData.localName}');
      print('manufacturerData: ${beacon.scanResult.advertisementData.manufacturerData}');
      print('serviceData: ${beacon.scanResult.advertisementData.serviceData}');
      print('tx: ${beacon.tx}');
      print('rssi: ${beacon.rssi}');
      print('distance: ${beacon.distance}');

      ib = beacon;

      if(ib.uuid == "df19e9a46f0d4c4aa104e7ddd31a4ab5") {
        print('uuid: ${ib.uuid}');
        print('major: ${ib.major}');
        print('minor: ${ib.minor}');
        print('rssi: ${ib.rssi}');
        print('distance: ${ib.distance}');

        temp = (ib.major).toDouble();
        co2 = (ib.minor).toDouble();
        dist = (ib.distance * 1000).toInt() / 1000;

        message = "気温:${temp} [℃]\nCO₂濃度:${co2} [ppm]\n距離:${dist} [m]";
      }

      setState(() {
        beacons[beacon.hash] = beacon;
      });
    });

  }

  @override
  Widget build(BuildContext context) {
    // This method is rerun every time setState is called, for instance as done
    // by the _incrementCounter method above.
    //
    // The Flutter framework has been optimized to make rerunning build methods
    // fast, so that you can just rebuild anything that needs updating rather
    // than having to individually change instances of widgets.
    return Scaffold(
      appBar: AppBar(
        // Here we take the value from the MyHomePage object that was created by
        // the App.build method, and use it to set our appbar title.
        title: Text(widget.title),
      ),
      body: Center(
        // Center is a layout widget. It takes a single child and positions it
        // in the middle of the parent.
        child: Column(
          // Column is also a layout widget. It takes a list of children and
          // arranges them vertically. By default, it sizes itself to fit its
          // children horizontally, and tries to be as tall as its parent.
          //
          // Invoke "debug painting" (press "p" in the console, choose the
          // "Toggle Debug Paint" action from the Flutter Inspector in Android
          // Studio, or the "Toggle Debug Paint" command in Visual Studio Code)
          // to see the wireframe for each widget.
          //
          // Column has various properties to control how it sizes itself and
          // how it positions its children. Here we use mainAxisAlignment to
          // center the children vertically; the main axis here is the vertical
          // axis because Columns are vertical (the cross axis would be
          // horizontal).
          mainAxisAlignment: MainAxisAlignment.center,
          children: <Widget>[
            Container(                           // <== Container 以下を変更
              decoration: BoxDecoration(
                border: Border.all(color: Colors.green, width: 2),
                borderRadius: BorderRadius.circular(8),
              ),
              padding: EdgeInsets.all(8),
              child: Text(
                message,
                style: Theme.of(context).textTheme.headline4,
              ),
            ),
          ],
        ),
      ),
    );
  }
}
今回も、これだけです。まず、必要な import や、アプリケーションの表題などを適ほど、追加・変更しています。 そして、"_MyHomePageState" class では、必要となる変数の宣言や、インスタンスの作成を行います。
String message = 'starting...';

FlutterBlueBeacon flutterBlueBeacon = FlutterBlueBeacon.instance;
FlutterBlue _flutterBlue = FlutterBlue.instance;
IBeacon iBeacon;

StreamSubscription _scanSubscription;
Map<int, Beacon> beacons = new Map();

BluetoothState state = BluetoothState.unknown;
"message" 変数には、iBeacon から送られてきた測定結果を格納します。そして、"flutterBlueBeacon" と "flutterBlue" のインスタンス作成、送られてきたデータを取り扱うための "IBeacon" class、データを受け取る "StreamSubscription"、複数の iBeacon をハッシュを用いて管理するための "Map" class、Bluetooth の state 管理用 class を準備します。
"initState()" メソッドでは、"flutter_blue" と "StreamSubscription" の state 設定(初期設定)を行い、_startScan() を呼び出しています。
void initState() {
  super.initState();

  _flutterBlue.state.then((s) {
    setState(() {
      state = s;
    });
  });

  _stateSubscription = _flutterBlue.onStateChanged().listen((s) {
    setState(() {
      state = s;
    });
  });

  _startScan();
}
"_startScan()" メソッドでは、必要なオブジェクトや変数の宣言を行った後に、"_scansubscription" で iBeacon をスキャンした結果を listen() つまり、聞き取っています。localname,..rssi,distance 等、聞き取った内容を print() でコンソールにデバッグ出力し、データを取り扱うための class "IBeacon" にセットしています。
_startScan() {
  IBeacon ib;
  double temp;
  double pres;
  double dist;
  double co2;

  print("Scanning now");
  _scanSubscription = flutterBlueBeacon
      //.scan(timeout: const Duration(seconds: 20))
      .scan()
      .listen((beacon) {
    print('localName: ${beacon.scanResult.advertisementData.localName}');
    print('manufacturerData: ${beacon.scanResult.advertisementData.manufacturerData}');
    print('serviceData: ${beacon.scanResult.advertisementData.serviceData}');
    print('tx: ${beacon.tx}');
    print('rssi: ${beacon.rssi}');
    print('distance: ${beacon.distance}');

    ib = beacon;

    if(ib.uuid == "df19e9a46f0d4c4aa104e7ddd31a4ab5") {
      print('uuid: ${ib.uuid}');
      print('major: ${ib.major}');
      print('minor: ${ib.minor}');
      print('rssi: ${ib.rssi}');
      print('distance: ${ib.distance}');

      temp = (ib.major).toDouble();
      co2 = (ib.minor).toDouble();
      dist = (ib.distance * 1000).toInt() / 1000;

      message = "気温:${temp} [℃]\nCO₂濃度:${co2} [ppm]\n距離:${dist} [m]";
    }

    setState(() {
      beacons[beacon.hash] = beacon;
    });
  });//, onDone: _stopScan);

}
つづく if 文では、"ib.uuid" と文字列を比較していますが、この文字列は、今回作成した二酸化炭素濃度測定 iBeacon に固有の ID です。これで iBeacon を識別しています。もし、聞き取った iBeacon が目的の二酸化炭素濃度測定機であれば、温度(temp)、二酸化炭素濃度(co2)、dist(測定機までの距離)を取得して "message" 変数に設定しています。
iBeacon では、この UUID と Major、Minor、RSSI のデータだけ送られてきますが、今回の二酸化炭素濃度測定機では、Major と Minor に温度と二酸化炭素濃度値を格納して送っています。
iBeacon については、下記ウェブサイトに分かり易く説明された資料があるので、お薦めです。
https://pages.rohm.co.jp/dp-make-manual005.html
そして、"build()" メソッドでは、iBeacon から送られてきた値の格納されている "message" を、Text Widget を利用して出力しています。
children: <Widget>[
  Container(
    decoration: BoxDecoration(
      border: Border.all(color: Colors.green, width: 2),
      borderRadius: BorderRadius.circular(8),
    ),
    padding: EdgeInsets.all(8),
    child: Text(
      message,
      style: Theme.of(context).textTheme.headline4,
    ),
  ),
],
準備ができたら、いつものように実行して確認をしますが、今回は冒頭でも説明した通り、二酸化炭素濃度測定用ハードウェアの準備も必要です。そちらの解説から読み進めている方は、一旦、測定機の解説に戻って、読み進めて下さい。 もうハードウェアの準備も終わって、実行するだけだよという方は、実行して確かめてみましょう。
実行すると、以下のように気温と二酸化炭素濃度、そして、iBeacon までの距離が表示されます。
また、この次の記事では、ゲージ Widget を使った、かっこいい表示方法も説明します。
a-software-resources.hatenablog.com
以上
わんぱく Flutter! 第五回 Firebase にログイン!
第四回で画像認識に使用した Firebase ですが、主な機能は機械学習ではなく、〜base と付いているだけあって、データベースが中心のサービスです。今回はその Firebase を使用する為のにログイン機能を組んでみます。 とは言っても、初期化して ID、Password を API に渡すだけですから、簡単です。しかし、Firebase も Flutter のパッケージも日々、更新されていますので、使い方がどんどん変わっています。今回も、最新の情報に気をつけて作成して下さい。この記事は、2021年4月24日の情報を元に執筆しています。
1. Firebase の設定
こちらは、「第四回 いきなりっ! 画像認識をしてみよう。 - 1.Firebase を使えるようにする」を参考に、Firebase のウェブサイトから、新しく Firebase にプロジェクトを作って下さい。或いは、第四回で使用したプロジェクトを流用して、Flutter のプログラムファイル main.dart のファイル名を何か別の名前に変更して、新しく main.dart ファイルを作ってもいいです。
今回は firebase_ml_vision は使用しないので、firebase_ml_vision の API の設定などは必要ありませんが、特にしてあっても問題はありません。気を付けなければならない点としては、Flutter のパッケージ名を Firebase 側の設定と合わせる事と、google-service.json を app レベルに保存しておくことでしょうか。
2. Firebase Authentication の準備
FIrebase の設定が終わったら、Firebase の認証機能を使えるようにします。Firebase のウェブサイトから、今回のプログラムに使用する Firebase のプロジェクトを開いて、"Authentication" をクリックします。
そうすると、「始める」ボタンがあると思いますので、それをクリックして "Authentication" - "Sign-in method" のタブを開きます。
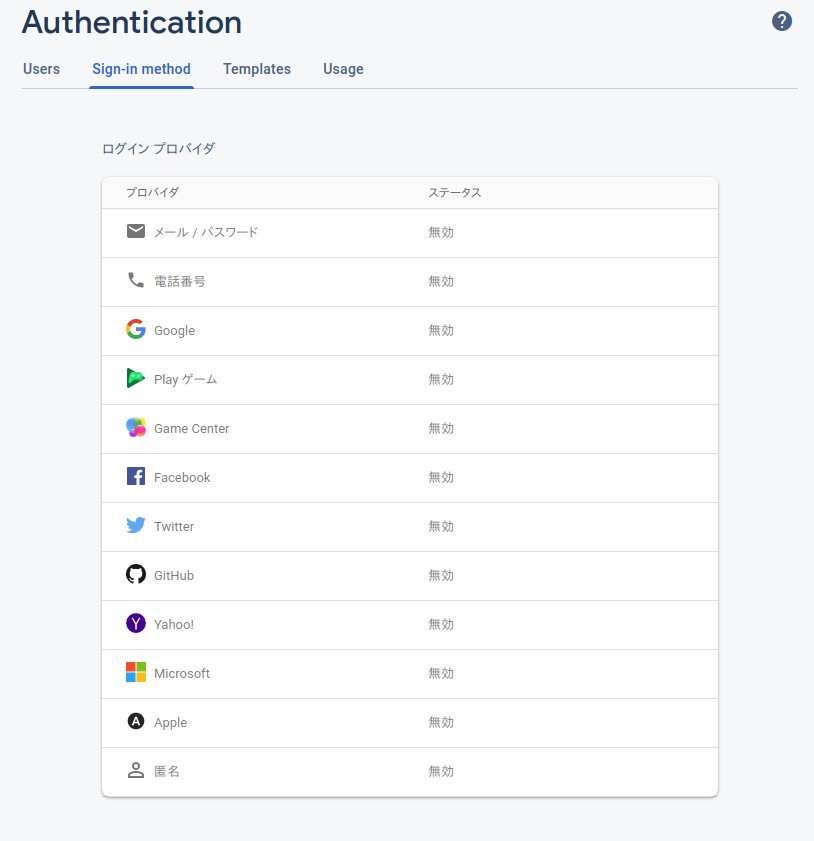
今回は、「メール/パスワード」でのログインを作成するので、一番上のプロバイダ「メール/パスワード」を「有効」にします。

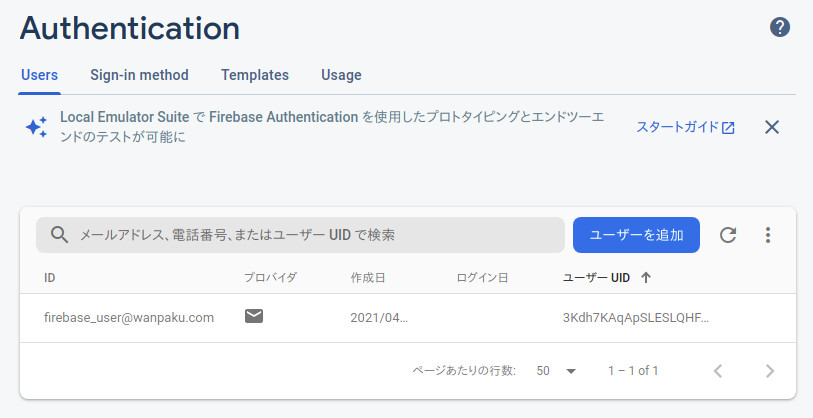
有効にしたら、"Users" タブから新しい「ユーザーを追加」します。メールアドレスとパスワードの組み合わせは、今、ログインしているアカウントではなくても大丈夫です。今回のプログラムで使用するものです。
これで Firebase のウェブサイト側の準備はできました。そうしたら、Flutter のパッケージ firebase_auth: ^1.1.1 を pubspec.yaml に設定して、Pub get して下さい。
dependencies:
  flutter:
    sdk: flutter


  # The following adds the Cupertino Icons font to your application.
  # Use with the CupertinoIcons class for iOS style icons.
  cupertino_icons: ^1.0.2
  firebase_core: ^1.0.3
  firebase_auth: ^1.1.1
ここでも、パッケージのバージョン番号に気を付けてください。2021年4月24日現在では、上記バージョンが最新となっています。
3. Firebase にログインする
AndroidStudio が自動的に作成している main.dart を下記の通り変更します。全文を載せているので、丸々入れ替えてしまっても構いません。
import 'package:flutter/material.dart';
import 'package:firebase_core/firebase_core.dart';   // <== 追加
import 'package:firebase_auth/firebase_auth.dart';   // <== 追加

final FirebaseAuth auth = FirebaseAuth.instance;       // <== 追加

void main() async{       // <== 変更

  WidgetsFlutterBinding.ensureInitialized();        // <== 追加
  await Firebase.initializeApp();             // <== 追加

  runApp(MyApp());
}

class MyApp extends StatelessWidget {
  // This widget is the root of your application.
  @override
  Widget build(BuildContext context) {
    return MaterialApp(
      title: 'login',     // <== 変更
      theme: ThemeData(
        // This is the theme of your application.
        //
        // Try running your application with "flutter run". You'll see the
        // application has a blue toolbar. Then, without quitting the app, try
        // changing the primarySwatch below to Colors.green and then invoke
        // "hot reload" (press "r" in the console where you ran "flutter run",
        // or simply save your changes to "hot reload" in a Flutter IDE).
        // Notice that the counter didn't reset back to zero; the application
        // is not restarted.
        primarySwatch: Colors.blue,
      ),
      home: MyHomePage(title: 'Login'),    // <== 変更
    );
  }
}

class MyHomePage extends StatefulWidget {
  MyHomePage({Key key, this.title}) : super(key: key);

  // This widget is the home page of your application. It is stateful, meaning
  // that it has a State object (defined below) that contains fields that affect
  // how it looks.

  // This class is the configuration for the state. It holds the values (in this
  // case the title) provided by the parent (in this case the App widget) and
  // used by the build method of the State. Fields in a Widget subclass are
  // always marked "final".

  final String title;

  @override
  _MyHomePageState createState() => _MyHomePageState();
}

class _MyHomePageState extends State<MyHomePage> {
  int _counter = 0;

  String USER_ID;                     // <== 追加
  String PASS;                       // <== 追加
  String ErrorMessage = "ログインして下さい。";     // <== 追加

  void _incrementCounter() {
    setState(() {
      // This call to setState tells the Flutter framework that something has
      // changed in this State, which causes it to rerun the build method below
      // so that the display can reflect the updated values. If we changed
      // _counter without calling setState(), then the build method would not be
      // called again, and so nothing would appear to happen.
      _counter++;
    });
  }

  @override
  Widget build(BuildContext context) {
    // This method is rerun every time setState is called, for instance as done
    // by the _incrementCounter method above.
    //
    // The Flutter framework has been optimized to make rerunning build methods
    // fast, so that you can just rebuild anything that needs updating rather
    // than having to individually change instances of widgets.
    return Scaffold(
      appBar: AppBar(
        // Here we take the value from the MyHomePage object that was created by
        // the App.build method, and use it to set our appbar title.
        title: Text(widget.title),
      ),
      body: Center(
        // Center is a layout widget. It takes a single child and positions it
        // in the middle of the parent.
        child: Column(
          // Column is also a layout widget. It takes a list of children and
          // arranges them vertically. By default, it sizes itself to fit its
          // children horizontally, and tries to be as tall as its parent.
          //
          // Invoke "debug painting" (press "p" in the console, choose the
          // "Toggle Debug Paint" action from the Flutter Inspector in Android
          // Studio, or the "Toggle Debug Paint" command in Visual Studio Code)
          // to see the wireframe for each widget.
          //
          // Column has various properties to control how it sizes itself and
          // how it positions its children. Here we use mainAxisAlignment to
          // center the children vertically; the main axis here is the vertical
          // axis because Columns are vertical (the cross axis would be
          // horizontal).
          mainAxisAlignment: MainAxisAlignment.center,
          children: <Widget>[
            Container(               // <== TextWidget を修正
              width: 300.0, height: 50.0,
              child: Text( ErrorMessage ),
            ),
            /*        // <== この TextWidget はコメントアウト
            Text(
              '$_counter',
              style: Theme.of(context).textTheme.headline4,
            ),
            */
            Container(          // <== この後の Widgets は追加
              width: 300.0, height: 50.0,
              child: new TextField(
                enabled: true, maxLength: 50, style: TextStyle(color: Colors.black),
                obscureText: false, maxLines:1 ,
                onChanged: (String value){
                  USER_ID = value;
                },
                decoration: const InputDecoration(
                  icon: Icon(Icons.face),
                  hintText: 'メールアドレスを入力してください。',
                  labelText: 'e-mail address:',
                ),
              ),
            ),
            Container(
              width: 300.0, height: 50.0,
              child: new TextField(
                enabled: true, maxLength: 20, style: TextStyle(color: Colors.black),
                obscureText: true, maxLines:1,
                onChanged: (String value){
                  PASS = value;
                },
                decoration: const InputDecoration(
                  icon: Icon(Icons.lock_open),
                  hintText: 'パスワードを入力してください。',
                  labelText: 'passowrd:',
                ),
              ),
            ),
            Center(
              child: ElevatedButton(
                child: Text('Login'),
                onPressed: () async {
                  try {
                    final result = await auth.signInWithEmailAndPassword(email: USER_ID,password: PASS);

                    setState(() {
                      ErrorMessage = "ログイン成功";
                    });

                  } catch (e) {
                    setState(() {
                      ErrorMessage = "ログインできません。";
                    });
                  }
                }
              )
            )
          ],
        ),
      ),
    );
  }
}
簡単に説明すると、まず、Firebase にログインするために必要な dart ファイル 2つを import します。import とは、英語の意味の通り、プログラムを読み込んでくると言う意味です。
import 'package:firebase_core/firebase_core.dart';
import 'package:firebase_auth/firebase_auth.dart';
次に、FIrebase のインスタンスを作成しています。インスタンスとは、実体といった意味ですが、プログラムをメモリに読み込んできて、使える状態にすると言う意味です。
final FirebaseAuth auth = FirebaseAuth.instance;
そして、main() 関数から 2つのAPI を呼び出していますが、これは Firebase を使用する為の初期化(initialize)関数です。言い換えると、Firebase を使うための初期設定です。
void main() async{

  WidgetsFlutterBinding.ensureInitialized();
  await Firebase.initializeApp();

  runApp(MyApp());
}
main() 関数の最初の行に "async" と言う表記がありますが、これは、直ぐ下にある "await" と組み合わせて使う機能です。英語の asynchronize と await そのままの意味ですが、この大かっこの中は「非同期」処理であること、そして await のところは処理が終わるのを「待つ」という事になります。ですから、await の所の初期化処理が終わってから、runApp() つまり、プログラムを開始します。
次に、プログラムのタイトルを、ちょこちょこっと変更しています。
Widget build(BuildContext context) {
  return MaterialApp(
    title: 'login',
    theme: ThemeData(
      // This is the theme of your application.
      //
      // Try running your application with "flutter run". You'll see the
      // application has a blue toolbar. Then, without quitting the app, try
      // changing the primarySwatch below to Colors.green and then invoke
      // "hot reload" (press "r" in the console where you ran "flutter run",
      // or simply save your changes to "hot reload" in a Flutter IDE).
      // Notice that the counter didn't reset back to zero; the application
      // is not restarted.
      primarySwatch: Colors.blue,
    ),
    home: MyHomePage(title: 'Login'),
  );
}
_MyHomePageState Class の最初では、ログインに使用する文字列変数を 3つ宣言しています。これらも呼んで字のごとくです。
String USER_ID;
String PASS;
String ErrorMessage = "ログインして下さい。";
後は、エラーメッセージを表示する為に既存の Text Widget を修正・コメントアウトし、ID、Password 用に TextField Widget を 2つと、ログイン実行用に ElevatedButton Widget を追加しています。これらは、「第二回 Widget を試してみよう!」を参照しながら、上記 main.dart のソースコードを直接参照してみて下さい。
ElevatedButton では、"onPressed" の処理(ボタンが押された時)に、ログイン用 API である signInWithEmailAndPassword() を呼び出しています。これは、冒頭で作成したインスタンス FirebaseAuth.instance の機能なので、auth.sign... と記述されています。
onPressed: () async {
  try {
    final result = await auth.signInWithEmailAndPassword(email: USER_ID,password: PASS);

    setState(() {
      ErrorMessage = "ログイン成功";
    });

  } catch (e) {
    setState(() {
      ErrorMessage = "ログインできません。";
    });
  }
}
ID と Password を引数に指定して呼び出しているだけですから、特に難しいことはありません。 "async" と "await" は、先に説明したのと同じく、処理が終わるのを待ってから、次の処理に移ることを意味しています。"try" と "catch" についてですが、これは例外処理と言って、エラーが発生した時にどうするかを指定しています。つまり、"try" の大かっこで囲まれた中の処理で、エラーが発生した時には、"catch" の大かっこで囲まれた処理を行います。ここでは、「ログインできません」というメッセージを ErrorMessage 変数にセットします。
setState() ですが、これは、Flutter でのフレームワーク(決められた書き方)の一つで、この中での処理が実行されたら、Widget などを実行後の新しい値で更新することを意味しています。setState() の中で更新しなければ、変更内容は直ぐに反映されません。
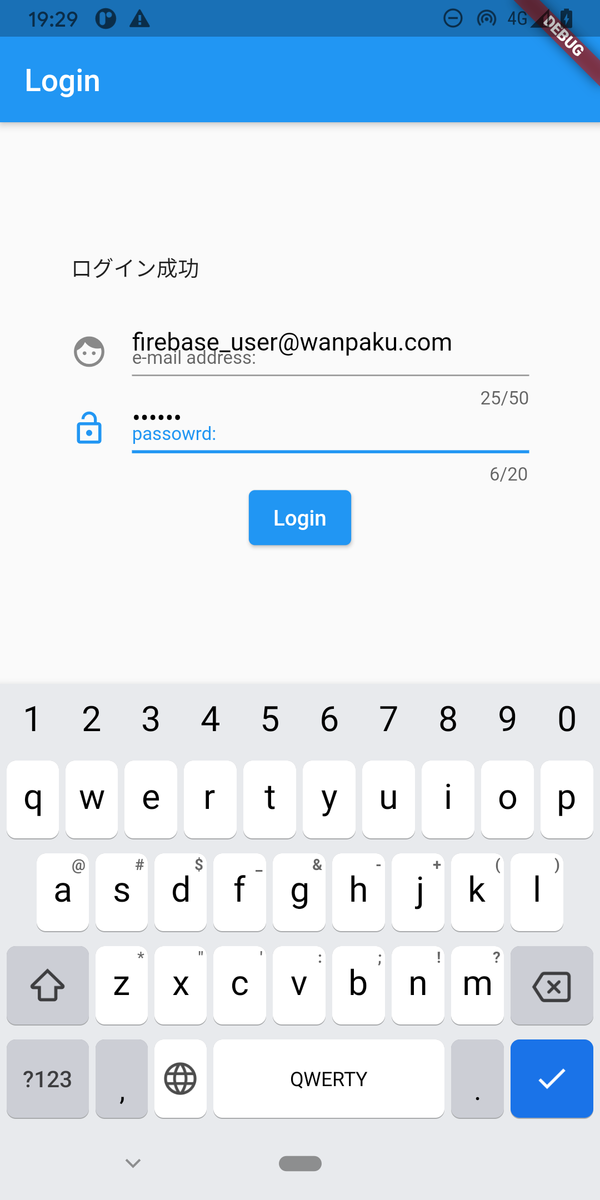
では、実行してみましょう。

正しく動作しているようでしたら、最初に設定したメールアドレスとパスワードを入力して "login" ボタンを押すとログイン処理が実行されます。
もしかすると、最初はなかなか上手く動かないかもしれません。何か間違いがないか根気強く確認してみて下さい。結構、ちょっとしたミスでエラーになっています。build.grade に設定したパッケージ名は、Firebase の設定と同じになっているでしょうか。google-service.json は、app レベルのディレクトリに保存してあるでしょうか。
以上
わんぱく Flutter! 第四回 いきなりっ! 画像認識をしてみよう。
これまでで、基本的な Flutter の使い方をやってきました。あとは、たくさん用意されている Widgets を使いこなすだけですが、Flutter の魅力の一つに、パッケージがあります。Flutter も Python と同じようにパッケージを読み込むことで、簡単に機能拡張を行うことができます。今回は、Google が買収した Firebase に用意されている機械学習(Machine Learning)機能のひとつ、画像認識をしてみようと思います。
1. Firebase を使えるようにする
Flutter から Firebase を使えるようにするには、firebase_core を pubspec.yaml に追加して、"pub get" コマンドでインストールする必要がありますが、ここら辺はたくさんのウェブサイトが用意されていますので、何かあればそちらを参照するといいでしょう。公式ウェブサイトは、こちらです。
日々更新されているので、少し古い記事になると、バージョン番号が変わっていたり、API 名が変わっていたり、無意味につまずく事になるので、なるべく新しい記事、或いは、公式アナウンスを確認しながら進めるのがいいでしょう。 Google のアカウントは既に持っていると思いますので、下記 Firebase の Top ページ右上の「コンソールへ移動」を押します。Google のアカウントがない人は早速作成しましょう。
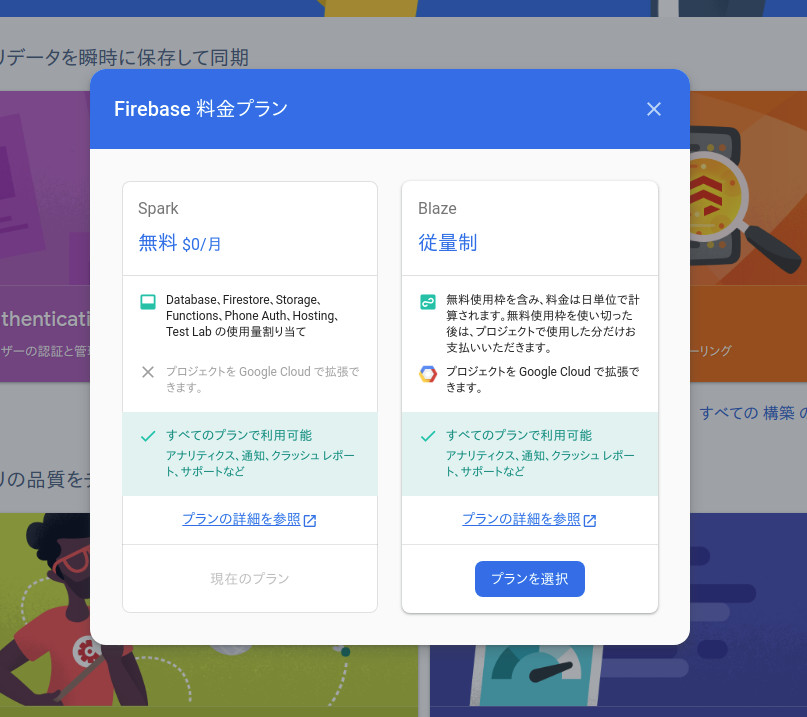
そうすると、新しいプロジェクトを作成する画面が現れるので、ボタンを押して一つ作成します。名前やアナリクティクスの設定をして続行します。アナリクティクスはデフォルトのままでいいでしょう。作成されると、プロジェクト名の横にプランの変更ボタンがあります。最初は「Spark プラン」になっていますが、機械学習は従量制プランから使える機能なので、従量制プランである「Blaze」に切り替えておきます。切り替えには、クレジットカードの登録が必要です。従量制プランでは、一定量(機械学習では、1000/月アクセス)までは課金が掛かりませんが、それを越えると課金されるので、注意しましょう。
そうしたら、今回作成する画像認識用の Flutter アプリケーションのベースにする新しいプロジェクトを準備しておきましょう。android studio から、新規にプロジェクトを作成します。
Flutter の準備ができたら、Firebase のプロジェクトのウェブサイトに戻ります。プロジェクトの画面からアンドロイドマーク、今回は android 用アプリケーションを作成しているので、アンドロイドのマークをクリックすると、android のアプリケーションを開発するのに必要な設定を説明した画面が表示されます。
「アプリの登録」では、android パッケージ名や、ニックネーム、デバッグ用の署名証明書の登録を行いますが、パッケージ名以外は省略可能です。パッケージ名は、Flutter アプリケーションの app レベル build.grade に設定されている applicationId (※下記 figure 02 参照)と同じものを設定します。

apply plugin: 'com.android.application'
apply from: "$flutterRoot/packages/flutter_tools/gradle/flutter.gradle"
apply plugin: 'com.google.gms.google-services'  // <<== Google サービスプラグイン

android {
    compileSdkVersion 30

    defaultConfig {
        // TODO: Specify your own unique Application ID (https://developer.android.com/studio/build/application-id.html).
        applicationId "com.wanpaku.mlvision"  // <<== applicationId
        minSdkVersion 29
        targetSdkVersion 30
        versionCode flutterVersionCode.toInteger()
        versionName flutterVersionName
    }

    buildTypes {
        release {
            // TODO: Add your own signing config for the release build.
            // Signing with the debug keys for now, so `flutter run --release` works.
            signingConfig signingConfigs.debug
        }
    }
    dependencies {
        api 'com.google.firebase:firebase-ml-vision-image-label-model:20.0.2'  // <<== 画像認識用API
    }
}
パッケージ名を登録すると、google-service.json を download するボタンが現れます。このファイルも指示通り download して、 app レベル build.grade と同じディレクトリに保存します。
次は、Firebase SDK の設定です。 app レベルの build.grade に Google サービスプラグイン(※上記参照)を追加します。
apply plugin: 'com.google.gms.google-services'
そして、画像認識用 API も追加します。
dependencies {
    api 'com.google.firebase:firebase-ml-vision-image-label-model:20.0.2'
}
また、もう一つの build.grade であるプロジェクトレベルの build.grade を開き、classpath を追加します。この build.grade は、先程の app レベルの build.grade の一つ上のディレクトリにあります。
buildscript {
    repositories {
        google()
        jcenter()
    }

    dependencies {
        classpath 'com.android.tools.build:gradle:4.1.0'
        classpath 'com.google.gms:google-services:4.3.5'  // <<== classpath
    }
}

allprojects {
    repositories {
        google()
        jcenter()
    }
}

rootProject.buildDir = '../build'
subprojects {
    project.buildDir = "${rootProject.buildDir}/${project.name}"
}
subprojects {
    project.evaluationDependsOn(':app')
}

task clean(type: Delete) {
    delete rootProject.buildDir
}
これで、android から Firebase へアクセスできるようになりました。後は、パッケージを読み込んでくるだけです。今回作成した Flutter プロジェクトの一番上のディレクトリに、pubspec.yaml というファイルがあります。ここに Firebase 用のパッケージ firebase_core: ^1.0.3 を追加します。
dependencies:
  flutter:
    sdk: flutter


  # The following adds the Cupertino Icons font to your application.
  # Use with the CupertinoIcons class for iOS style icons.
  cupertino_icons: ^1.0.2
  firebase_core: ^1.0.3   # <<== firebase_core
  firebase_ml_vision: ^0.11.0+1
  image_picker: ^0.7.4

dev_dependencies:
  flutter_test:
    sdk: flutter
追加したら忘れずに Pub get を行って下さい。これは、pubspec.yaml に記述したパッケージを download してくるコマンドです。 android studio の場合は、pubspec.yaml を開いている画面の上方に Pub get コマンドが表示されています。コマンドラインから行う場合は、プロジェクトのディレクトリに移動して、flutter pub get コマンドを実行します。
Flutter のパッケージは、頻繁に更新されているので、最新の情報を確認しておく必要が有ります。パッケージ名の後ろの数字がバージョン番号ですが、2021年4月13日現在、firebase_core は、1.0.3 が最新バージョンです。
一通り設定が終わったら、Flutter のプロジェクトが作成したサンプルアプリケーションを実行して、正常に動作することを確認しておきます。
2. 機械学習パッケージ firebase_ml_vision を導入する
上述の pubspec.yaml には既に記載されているので気づいている人も多いと思いますが、firebase_ml_vision パッケージを導入していきます。また、画像を選択したり、写真を撮ったりするパッケージである image_picker も同時に導入します。
これは、Flutter から firebase の機械学習機能を利用するためのパッケージです。pubspec.yaml の firebase_core の直ぐ下に firebase_ml_vision: ^0.11.0+1 を追加して下さい。
image_picker も同様に image_picker: 0.7.4 を追加します。pubspec.yaml へ記述したら忘れずに Pub get を実行し、download して下さい。
image_picker は、非常によく利用されているパッケージですが、最新の Android SDK であるバージョン 30 で利用すると、画像や Camera へのアクセス権限の関連で正常に動作しないことがあります。そこで、忘れずにリソースへのアクセス権限の設定もしておきます。
数年前の firebase_ml_vision に関する記事では、この Android SDK 30 の仕様変更について考慮されていない為、最近、改めて記事の通りに設定しても、上手く動かないものがほとんどでした。また、私のこのソースでは、compileSdkVersion 30, minSdkVersion 29, targetSdkVersion 30 としています。
一つは、app レベルの build.grade ファイルのあるディレクトリの src/debug にある AndroidManifest.xml に <uses-permission android:name="android.permission.QUERY_ALL_PACKAGES"/> を下記の通り追加します。
<manifest xmlns:android="http://schemas.android.com/apk/res/android"
    package="systemquality.mlvision2">
    <!-- Flutter needs it to communicate with the running application
         to allow setting breakpoints, to provide hot reload, etc.
    -->
    <uses-permission android:name="android.permission.INTERNET"/>
    <uses-permission android:name="android.permission.QUERY_ALL_PACKAGES"/>
</manifest>
また同様に、src/main にある AndroidManifest.xml に android:requestLegacyExternalStorage="true" を追加します。
<manifest xmlns:android="http://schemas.android.com/apk/res/android"
    package="com.wanpaku.mlvision">
   <application
        android:label="mlvision2"
        android:requestLegacyExternalStorage="true"
        android:icon="@mipmap/ic_launcher">
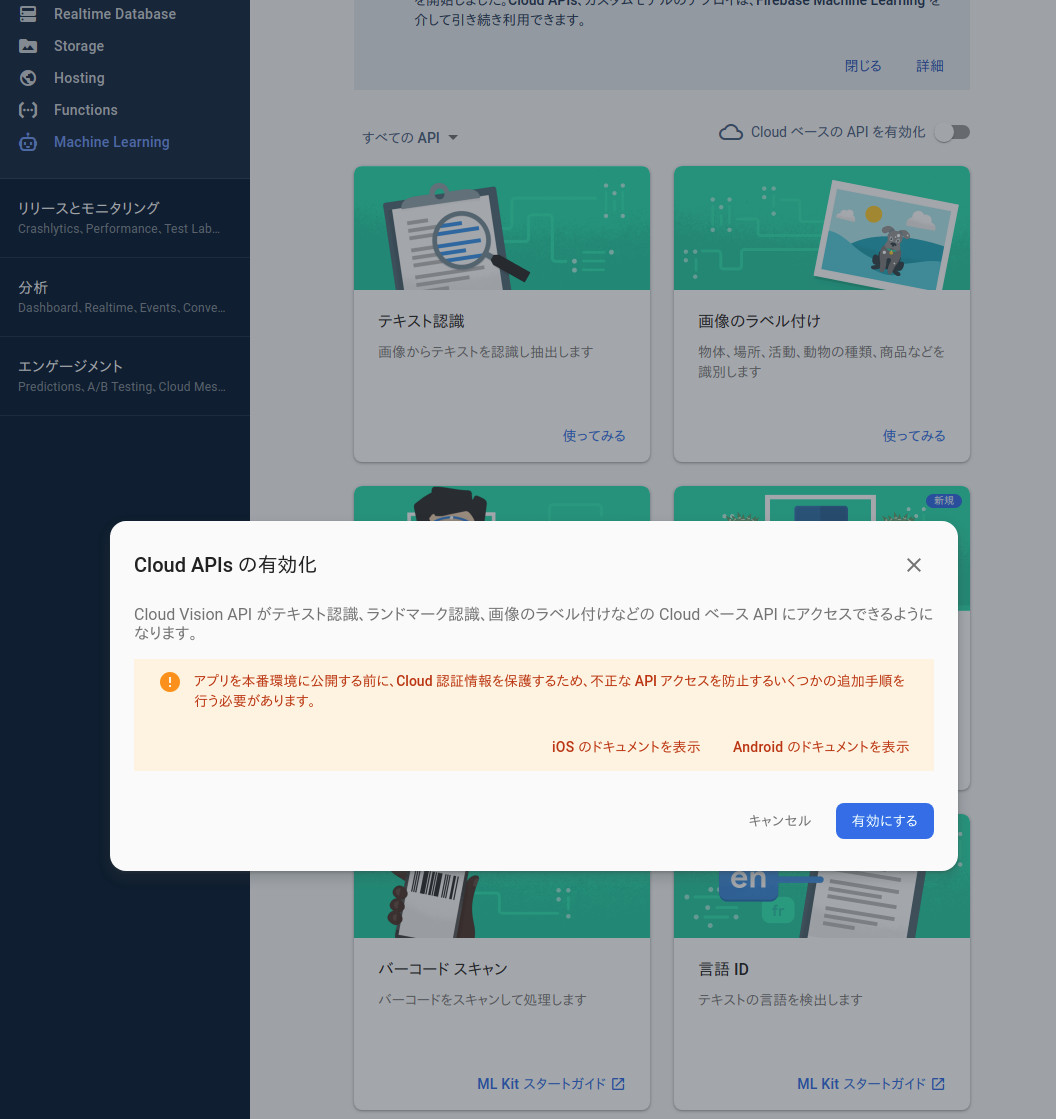
3. Firebase 機械学習による画像認識
今回は、cloud ベースの画像認識機能を使っているので、Firebase のプロジェクト概要ページの左側メニューにある「Machine Learning」の「始める」ボタンから、「Cloud ベースの API を有効化」スイッチを入れて、使えるようにしておきます。
そうしたら、main.dart のサンプルプログラムを以下のプログラムで丸ごと置き換えて下さい。
import 'dart:io';
import 'package:firebase_ml_vision/firebase_ml_vision.dart';
import 'package:flutter/material.dart';
import 'package:image_picker/image_picker.dart';

void main() {
  runApp(MyApp());
}

class MyApp extends StatelessWidget {
  @override
  Widget build(BuildContext context) {
    return MaterialApp(
      title: 'Flutter Demo',
      theme: ThemeData(
        primarySwatch: Colors.blue,
      ),
      home: MyHomePage(title: 'sample of firebase_ml_vision'),
    );
  }
}

class MyHomePage extends StatefulWidget {
  MyHomePage({Key key, this.title}) : super(key: key);
  final String title;

  @override
  _MyHomePageState createState() => _MyHomePageState();
}

class _MyHomePageState extends State<MyHomePage> {
  File _image;
  String _text = "No Image";
  String _entityId = "";
  double _confidence = 0.0;

  @override
  Widget build(BuildContext context) {
    return Scaffold(
      appBar: AppBar(
        title: Text(widget.title),
        centerTitle: true,
      ),
      body: Center(
        child: Stack(
            children: [
              _image != null ? Image.file(_image) : Text("") ,
              Container(
                child: TextFormField(
                    decoration: InputDecoration(
                        labelText: _text,
                        fillColor: Colors.white,
                        filled: true,
                        enabledBorder: OutlineInputBorder(
                            borderRadius: BorderRadius.circular(25.0),
                            borderSide: BorderSide(color: Colors.blue)
                        )
                    )
                ),
              ),
            ]
        ),
      ),
      floatingActionButton: FloatingActionButton(
        onPressed: () async {
          await _recognition();
        },
        child: Icon(
          Icons.add_a_photo,
          color: Colors.white,
        ),
      ),
    );
  }

  void _recognition() async {
    // final file = await ImagePicker().getImage(source: ImageSource.gallery);
    final file = await ImagePicker().getImage(source: ImageSource.camera);
    _image = File(file.path);


    final FirebaseVisionImage visionImage = FirebaseVisionImage.fromFile(_image);

    /*
    final ImageLabeler labeler = FirebaseVision.instance.imageLabeler();
    final List<ImageLabel> labels = await labeler.processImage(visionImage);

    setState(() {

      _text = "";

      for (ImageLabel label in labels) {
        _text += label.text.toString() + ",";
      }

    });

    labeler.close();
    */

    final ImageLabeler cloudLabeler = FirebaseVision.instance.cloudImageLabeler();
    final List<ImageLabel> cloudLabels = await cloudLabeler.processImage(visionImage);

    setState(() {

      _text = "";

      for (ImageLabel label in cloudLabels) {
        _text += label.text.toString() + ",";
      }

    });

    cloudLabeler.close();

  }
}
_recognition() 以外は、flutter のサンプルプログラムとまったく一緒なので、説明の必要はないと思いますが、画像ファイルの表示に使用している Image wedget は、三項演算子による分岐処理となっており、_image が null ではない時だけ Image.file() を処理し、 null の場合は、Text("") を表示するようになっています。
_image != null ? Image.file(_image) : Text("") ,
また、_recognition() では、imge_picker による画像取得と、
final file = await ImagePicker().getImage(source: ImageSource.camera);
取得した画像を firebase_ml_vision の cloud 画像認識 API で処理する部分が記述されています。_image のイメージ形式を変換し、インスタンス作成、そして API 呼び出しです。
final FirebaseVisionImage visionImage = FirebaseVisionImage.fromFile(_image);
final ImageLabeler cloudLabeler = FirebaseVision.instance.cloudImageLabeler();
final List<ImageLabel> cloudLabels = await cloudLabeler.processImage(visionImage);
灰色でコメントアウトされている部分と、直ぐ下の処理を変更すると、cloud 側で画像認識するのではなく、android 端末側で処理する API になります。プログラムの重要な部分は、これだけです。それでは実行してみましょう。
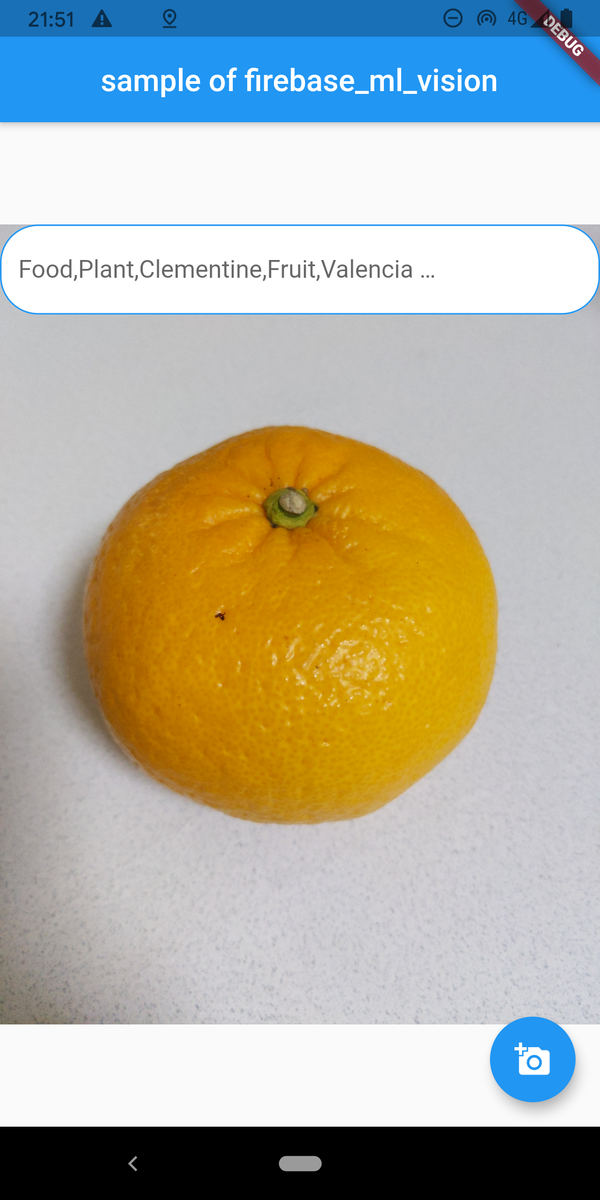
"Food,Clementine,Fruit,Valencia ..." だいたい合ってますね。 Clementine は、Cambride Dictionary によると、"a fruit like a small orange" となっていますので、確かにその通りです。
以上
この記事は、下記のウェブサイトを参考に作成しました。 firebase_ml_vision を使用した顔認証については、下記ウェブサイトが大変参考になります。ぜひ、ご参照下さい。
こちらは、Camera の Permission について書かれたウェブサイトです。新しい Android SDK で開発する場合は、必須となってきますので、注意が必要です。
わんぱく Flutter! 第三回 ページ移動をしてみよう!
前回は、動作確認用のアプリケーションに、色々な Widget を追加してみました。その他の基本的な動作と言えば、「ページ移動」ではないでしょうか。今回は、ページ移動を行ってみます。 Flutter のページ移動は、前回作成した動作確認用のアプリケーションと同様、新しい xxxx.dart ファイルに、ページを作成する class を記述して、呼び出し元 class から、Navigator.push() API を呼ぶだけです。それでは早速、やって行きましょう。
1. Navigator.push によるページ移動
まず、新しい xxxx.dart ファイルを作成します。どのような方法でも宜しいのですが、android studio を使っているなら、左ウィンドウの project - lib を右クリックして、new - dart file から "secondpage.dart" を作成します。作成したら、下記コードを記述して下さい。
import 'package:flutter/material.dart';

class secondpage extends StatefulWidget {
  secondpage({Key key}) : super(key: key);

  @override
  _secondpage createState() => _secondpage();
}

class _secondpage extends State<secondpage> {

  @override
  Widget build(BuildContext context) {
    return Scaffold(
      appBar: AppBar(
        title: Text("Second Page"),
      ),
      body: Center(
        child: Text("")
      ),
    );
  }
}
細かい説明は今回は飛ばして、Flutter の新しいページは、このフレームワークで書くのだと理解してください。 class が二つあるのが解ると思います。ひとつ目が、呼び出し側から見た class 名を記述します。そして、ふたつ目の class があると思います。違いは解るでしょうか。 ー
そう、 class 名の頭に "_" が付いています。 前回も簡単に説明してありますが、Flutter は頭に "_" を付けると、外部からは参照できない扱いとなります。
また、よく目立つ "return" の直ぐ下に "appBar:" と言う記述があります。これは、アプリケーションの上に表示されるバーです。これを付けておくと、画面遷移をした後に、戻るボタン "←" が自動的に表示されて便利です。特に理由がなければあって問題ないでしょう。
そうしたら、呼び出し元である main.dart に、Navigator.push() を追加します。ボタンを押した時にページ移動させたいのですから、ElevatedButton() の onPressed に記述します。大括弧の前に空の括弧があったり、少し妙ちくりんな記述ですが、ここは、こう書くのだと思って下さい。これも、dart のシンタックスシュガー(省略した表記法)です。解りにくいですね。
ElevatedButton(
  child: Text("Next"),
  onPressed: (){
    Navigator.push(
      context,
      MaterialPageRoute(builder: (context) => secondpage()),
    );
  }
)
Navigator.push() の引数の MaterialPageRoute() にある secondpage() が、今回新しく作ったページの class 名です。そして、新しく作った secondpage.dart を呼び出すのですから、main.dart の先頭にある import に、このファイルを加えておきます。
import 'package:flutter/material.dart';
import 'secondpage.dart';

void main() {
  runApp(MyApp());
}
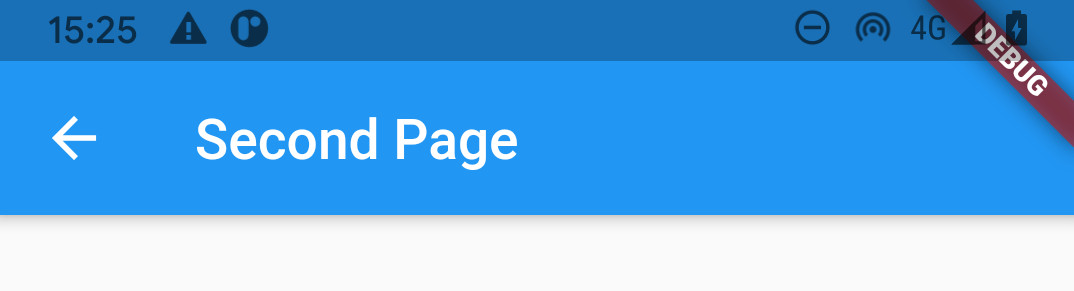
これで準備完了です。android studio を使っているのであれば、文法エラーなどには、赤い波線のアンダーラインが付くので、そこを直してから実行します。実行したら、中央に ElevatedButton() が表示されているはずです。言うまでもなく、そのボタンを押すと、ページ移動するという事です。

はい。無事、ページ移動しました。ページを戻る際は、上の appBar の矢印を利用します。
2. 引数による値渡し
次に必要になってくるのは、恐らく、引数による値渡しでしょう。ページ間で、何らかのデータのやり取りがあるのが普通です。これは、MaterialPageRoute() にある class の引数として渡します。例えば、"メッセージ" という文字列を、次のページの message と言う変数へ渡すなら、以下のように記述します。
Navigator.push(
  context,
  MaterialPageRoute(builder: (context) => secondpage( message: "メッセージ")),
);
そして、受け取り側である secondpage class では、引数として受け取った値を、this.message へ格納することを指定します。
import 'package:flutter/material.dart';

class secondpage extends StatefulWidget {
  secondpage({Key key, this.message}) : super(key: key);

  final String message;

  @override
  _secondpage createState() => _secondpage();
}
これで message を受け取ることができます。確かに受け取ることができたことを確認するために、Text Widget に表示してみましょう。
body: Center(
  child: Text( widget.message )
),
受け取った message を、下の class の Text Widget で使うには、上記の通り、widget に属する変数としてアクセスします。ちょっと込み入ってきますので、詳しい説明は後回しにしますが、上の class を、下の class が継承しているので、上の class で受け取った引数は、widget のプロパティとなります。
それでは実行してみましょう。

引数が複数ある場合は、カンマで繋げて記述します。
class secondpage extends StatefulWidget {
  secondpage({Key key, this.message1, this.message2}) : super(key: key);

  final String message1;
  final String message2;

  @override
  _secondpage createState() => _secondpage();
}
呼び出し側も同様です。
Navigator.push(
  context,
  MaterialPageRoute(builder: (context) => secondpage( message1: "メッセージ", message2: "メッセージ2")),
);
3. Global 変数を使用した値の参照
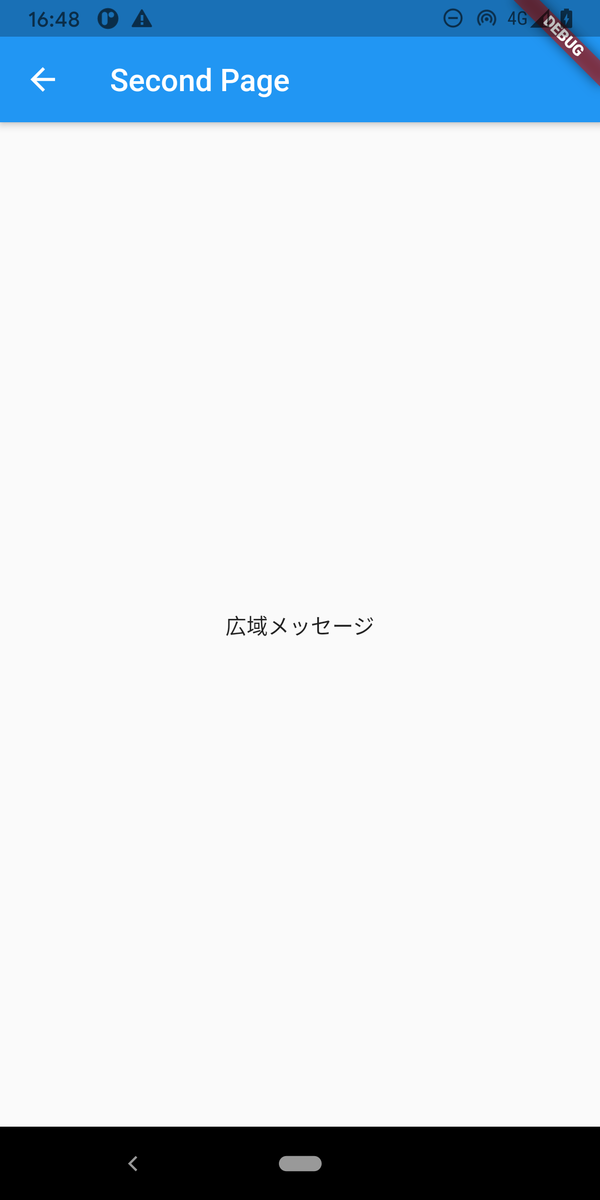
と、ここまでは行儀のよいプログラムでの、正攻法による値渡しですが、些か面倒です。私は、非常に面倒に感じているので、global 変数を使用することをお薦めします。
例えば、main.dart の先頭、import が記述されている直ぐ下に、プログラム全体で共有したい値を記述しておくと、他の xxxx.dart ファイルで記述している class からも参照することができます。
import 'package:flutter/material.dart';
import 'secondpage.dart';

String g_message = "広域メッセージ";

void main() {
  runApp(MyApp());
}
これは、dart プログラミング言語における変数の有効範囲(スコープ)を利用した値の共有方法です。ここで、g_message がプログラム全体で共有したい変数です。
import 'package:flutter/material.dart';
import 'main.dart';
secondpage.dart の先頭の import にも import 'main.dart'; を追加しておきます。そして、試しに Text Widget で表示させてみて下さい。
body: Center(
  child: Text( g_message )
),
flutter の値渡しは、こっちの方がいいんじゃない? とても簡単で、widget.xxxx の記述もいりません。それでは、実行してみましょう。
今回は、ページ移動と、値渡しについて解説しました。
以上
わんぱく Flutter! 第二回 Widget を試してみよう!
さて、第一回では、通例のインストールを行いました。最後に動作確認をしましたが、そのアプリケーションをちょこちょこ変更しながら、Flutter に用意されている Widget を試してみましょう。
1. サンプルプログラムの概観
動作確認用に作成した flutter_app を開きましょう。第一回から続けて読んでいる方は、開いている状態でしょう。

恐らく、目の前には main.dart ファイルのプログラムが見えているはずです。見えていない方は、ウィンドウ左側のツリーメニューから、"Project" - "flutter_app" - "lib" - "main.dart" と開いていくと、見つかるはずです。これが、今、作成した動作確認用のサンプルプログラムです。
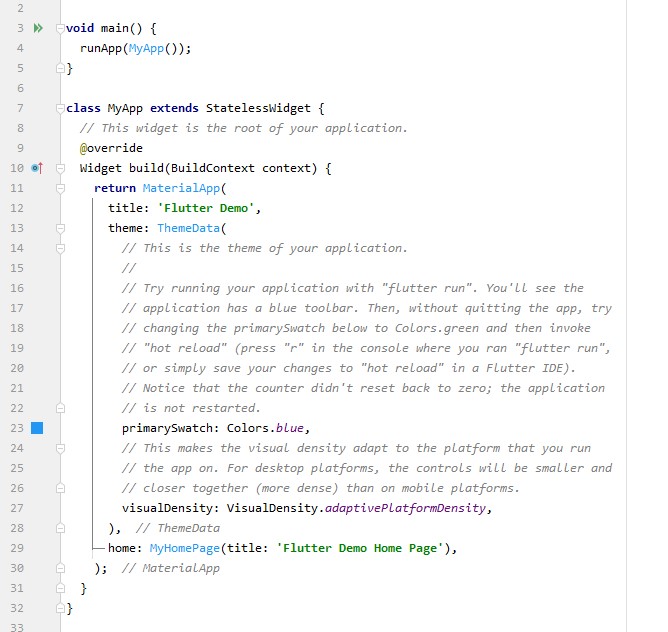
一番上に、"void main()" と書いてあります。 dart 言語も、C言語と同じように "main()" 関数から開始されます。そして、その中には、"runApp(MyApp());" と書かれてあります。これは、直ぐ下にある "class MyApp" を呼び出しています。
そして、その少し下の方を見てみると、"home: MyHomePage(title: 'Flluter Demo Home Page")" と書かれていますから、この "class MyApp" は、その更に下に書かれてある "MyHomePage" を呼び出していることが解ると思います。
ここで、class と言う言葉を使っていますが、これは、オブジェクト指向プログラミング言語では必ず出てくる word です。クラスとは、数学用語で幾つかの数のまとまりを表しています。クラスとは、数の数、ですから、処理やデータのまとまりを表していると考えて良いでしょう。
また少しスクロールして、"class MyHomePage" を見てみると、"_MyHomePageState" と頭に "_" の付いた似た名前の class を使用しています。そして直ぐ下にはその class が書かれてあります。
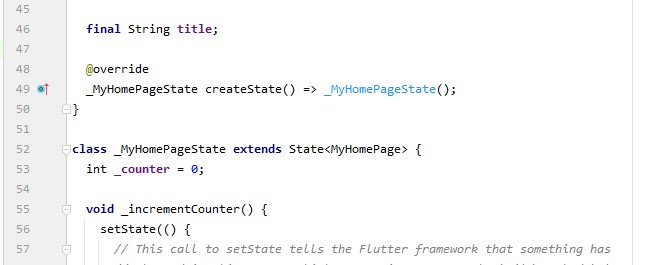
つまり、このサンプルプログラムの処理は、この "class _MyHomePageState" 内で行われていることが分かります。
この "=>" は、ファットアロー(fat allow)関数、或いは単に アロー(allow)関数と呼ばれるもので、JavaScript における function() を省略するために考案された表記法(シンタックスシュガー)です。 ここでは詳しくは説明しませんので、興味のある方は調べてみて下さい。
そしてまた、class の前に付いている "_" ですが、こちらは、オブジェクト指向言語における private 修飾子に相当します。
2. アプリケーションを変更して動作を確認してみよう
呼び出しフローを、順番に追ってきましたが、この class の中では、画面のレイアウトと、テキストボックスやボタンのような Widget について書かれています。

英語のコメントで、簡単な説明が書かれてありますが、この "Widget build()" とは、説明すると、テキストボックスやボタンなど(Widget)を構築(build)すると言う意味です。そして、直ぐ下には、"Scaffold()" メソッドが書かれてあります。これは訳すと、「足場」と言う意味です。Widget を構築する足場という意味になります。この中には、アプリケーションの上に表示されるアプリケーションバー "appBar" や、アプリケーションの胴体である "body" などがあります。
試しに、アプリケーションのタイトルを変更してみましょう。この "appBar" の中にある "widget.title" がアプリケーションのタイトルです。これは、プログラムの上の方で書かれてある "class MyApp" の "home: MyHomePage(title: 'Flluter Demo Home Page")" で指定しています。スクロールして、ここを変更してみましょう。
変更箇所は見つかったでしょうか。変更したら、android studio のメニューバーにある実行ボタン "➤" を押してみましょう。android のエミュレータを起動していない方は、"tool" - "AVD Manager" から、AVD を起動しておきます。
どうでしょうか。タイトルは上手く変更されたでしょうか。
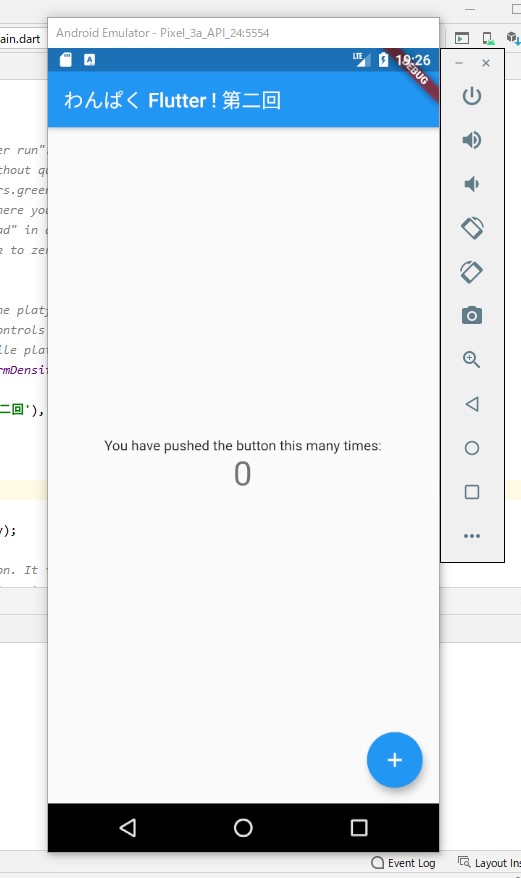
タイトルについて指定していたのは、"appBar" の中でした。その少し下には、"body: Center()" と書かれてあると思います。これは、読んで字のごとく、中心(Center)を指定しているのですが、Smart Phone のアプリケーションは、よくご存知の通り、画面の大きさも様々ですし、縦・横と回転もしますから、画面レイアウトを絶対位置で指定するのは、具合がよくありません。そこで、このように相対的な指定をしておくと、画面の大きさや向きに依存しない位置指定ができます。つまり、アプリケーションの胴体は、画面の中心に表示すると言う意味です。上の画像を見ると分かる通り、確かに画面の中心に "0" と表示されていると思います。
その下には、何と書かれてあるでしょうか。"child: Column()" と書かれてあります。 Flutter の Widget は、入れ子のように作っていきます。丁度、ロシア人形のマトリョーシカのような構造です。
ですから、ここでは、"Center()" の中に "child: Column()" と、"Column()" を "Center()" に入れ子のように配置します。 "Column()" とは、つまり、「縦」ですから、Widget を中心から、縦に並べて配置するという意味になります。実際、"You have pushed..." と数字 "0" は、中心から縦に配置されているのではないでしょうか。では、この "Column()" を、"Row()" に変更してみましょう。"Row" とは訳すと、「行」です。変更が終わったら、実行します。

どうでしょうか。横に並んで表示されたでしょうか。画面を回転させたりして、確認してみましょう。
では、一旦、"Row()" から、"Column()" に直しておきます。次は、Widget を追加してみます。 "Column()" の中を見ていくと、"Text()" と書かれた箇所が2つあります。読みにくいですが、それぞれ複数行に渡って、括弧で囲われて記述されています。そう、これは、今、表示されているテキストメッセージと、数字です。
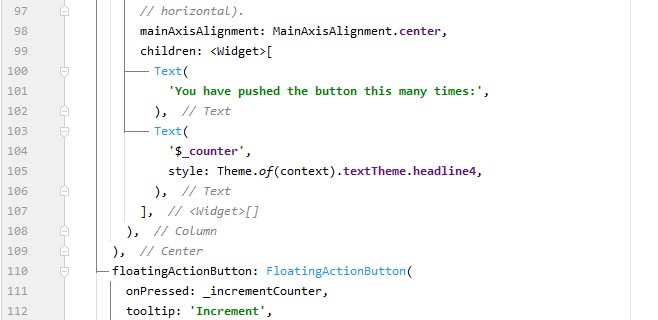
そして、2つの "Text()" は、"children: <Widget>[ ]" の中に入れ子になっています。先程は、"child: " と指定して、Widget を入れ子にしましたが、今度は、"children: " となっています。これは、英語で child の複数形ですから、幾つかの Widget をまとめて追加する場合に使用します。
この figure 07 の 106 行目のところに、コメントで "// Text" と書かれた行があります。この下に "TextField()" を追加してみましょう。 "TextField()" は、入力可能なテキストボックスです。
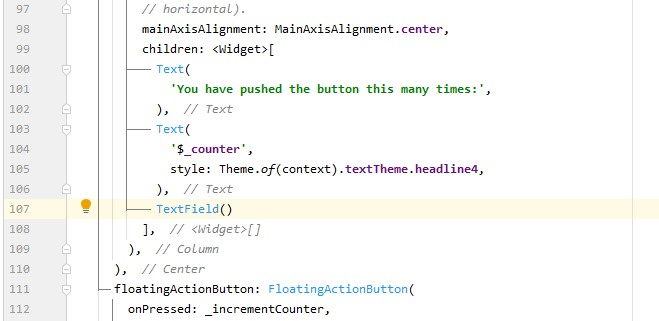
追加できたら、実行してみます。
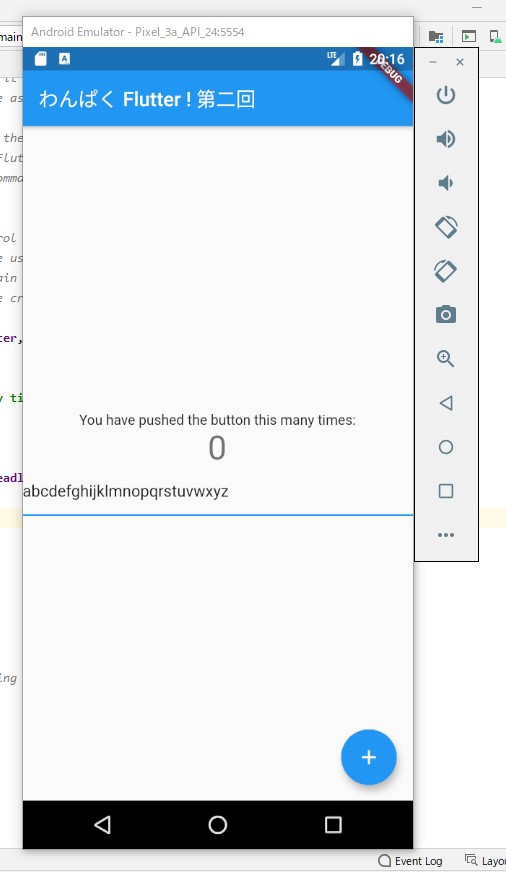
文字を入力して確認してみて下さい。
それでは、もう一つだけ、"ElevatedButton()" を追加しましょう。先程の "TextField()" の下の行に、figure 10 のように "ElevatedButton()" 追加して下さい。"TextField()" の後ろに "," を追加するのを忘れずに。
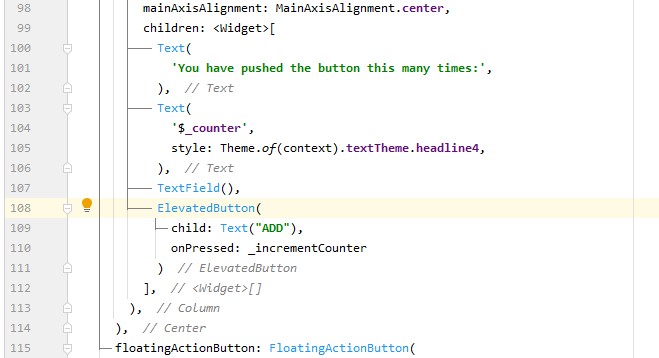
これは、ボタンを作成していますが、ボタンの文字列 "ADD" を入れ子に指定しています。つまり、"ElevatedButton()" の中に "child: " と指定して "Text()" を追加しています。"Text()" は、上でも使用しているのと同じテキストボックスです。また、"onPressed:" は、訳すと「押された時」という意味ですが、ボタンが押された時に行う処理を指定します。ここでは、”_incrementCounter" を指定していますが、これは、少し上の方、"class MyHomePageState" の初めに指定しているメソッドです。ボタンを押すと、数字に加算していきます。
プログラムの変更が終わったら、実行してみましょう。
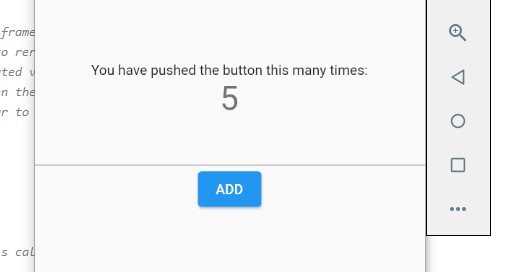
ボタンは表示されたでしょうか。これは、下の方にある "+" ボタンと同じように、押すと数値を加算していきます。
Flutter には、たくさんの Widget が用意されています。 Flutter のドキュメントなどを参照しながら、色々試してみましょう。
以上
わんぱく Flutter! 第一回 Flutter をインストールするよっ!
最近話題の Flutter、もう使ってますか? 私もこの程、利用を開始致しました。丁度よいので、開発履歴をここにまとめて行こうと思います。第1回は ー そう、インストールからです。 Flutter は、Android アプリケーションでも iOS アプリケーションでも Web アプリケーションでも開発することができますが、今回は Android 用アプリケーションを開発して行きます。
1. 準備
Android 用の開発環境として、Android Studio をインストールしておきます。 Android Studio のインストール方法は、わかり易い解説が多数、執筆されておりますので、それらのウェブサイトを参照してインストールしておいてください。
2. Flutter の取得(Download)
Flutter の SDK は、以下のウェブサイトから所望の OS 用のバイナリを取得(Download)します。
どの OS でも、大した差はありませんが、ここでは Windows 版を download したものとして話を進めます。
download が終わったら、解凍します。解凍先ディレクトリは特に規定はありませんが、自分の User ディレクトリや、"C:\Program Files"、"C:\" 等に解凍するといいでしょう。ここでは、 "C:\Program Files" に解凍したものとします。

Flutter SDK の解凍が終わったら、環境変数の設定をします。Windows の環境変数の設定方法は、説明の必要はないと思いますが、"設定" - "システム" - "詳細情報" - "詳細設定" - "システムのプロパティ" - "詳細設定" - "環境変数" 等から "Path" の値に Flutter SDK を解凍したディレクトリの "bin" を追加します。ここでは、 "C:\Progaram Files\flutter\bin" になります。
Flutter の document では、この後、flutter doctor コマンドを動かすことになっています。 flutter doctor の実行には、git が必要となるので、適当な時点で git もインストールしておきます。
いま、flutter のディレクトリにいるでしょうか。もし、違うディレクトリにいるなら、flutter のディレクトリに移動して、"flutter doctor" コマンドを実行します。そうすると、dart がインストールされていなければ、doctor コマンドがインストールしてくれます。
3. Flutter Plugin のインストール
Flutter SDK のインストールが終わったら、Android Studio に Flutter Plugin を追加します。Android Studio で開発を行っている人は、Android Studio を起動すると、前回終了したプロジェクトから起動してきてしまいますが、一旦、プロジェクトを "File" - "Close Project" 等から閉じて、タイトル画面を表示させます。
すると、下の方に "Configure" というコンボボックスが見えると思います。ここを開いて、 "Plugins" を選択します。

Plugin 関連の設定画面が開きますので、上の方にある "Marketplace" から "Flutter" を探してインストールボタンを押します。
これで、準備完了です。
4. 動作確認
タイトル画面には、"Create New Flutter Project" が現れていると思いますので、これを選択し、"Flutter Application" を作成します。
"Next" を押すと、プロジェクト名などを指定する画面が現れるので、適当に名前を付けます。そして、2つ目のテキストボックスに、"Flutter SDK path" があると思います。ここに、Flutter SDK をインストールしたディレクトリを指定します。

既に Android Studio の動作確認はされていると思いますので、AVD(Android Virtual Device) の作成は終わっているはずですから、 "Tool" - "AVD Manager" から、AVD を起動します。なければ、作成し、或いは、実際の Android 端末を USB に接続します。
"Running Gradle task 'assembleDebug'..." というメッセージで、しばらく待たされるかも知れませんが、無事、実行できたでしょうか。
以上