わんぱく Flutter! 第七回 syncfusion_flutter_gauges で二酸化炭素濃度測定機を Modify するっ!

前回の「わんぱく Flutter! 第六回 iBeacon で二酸化炭素測定っ!」では、iBeacon から送信された値を Flutter で表示させました。そのままでも、特に問題はありませんが、Flutter の特徴である見栄えのする UI(User Interface)でかっこよく Modify してみましょう。syncfusion_flutter_guages パッケージを使うので、簡単です。
a-software-resources.hatenablog.com
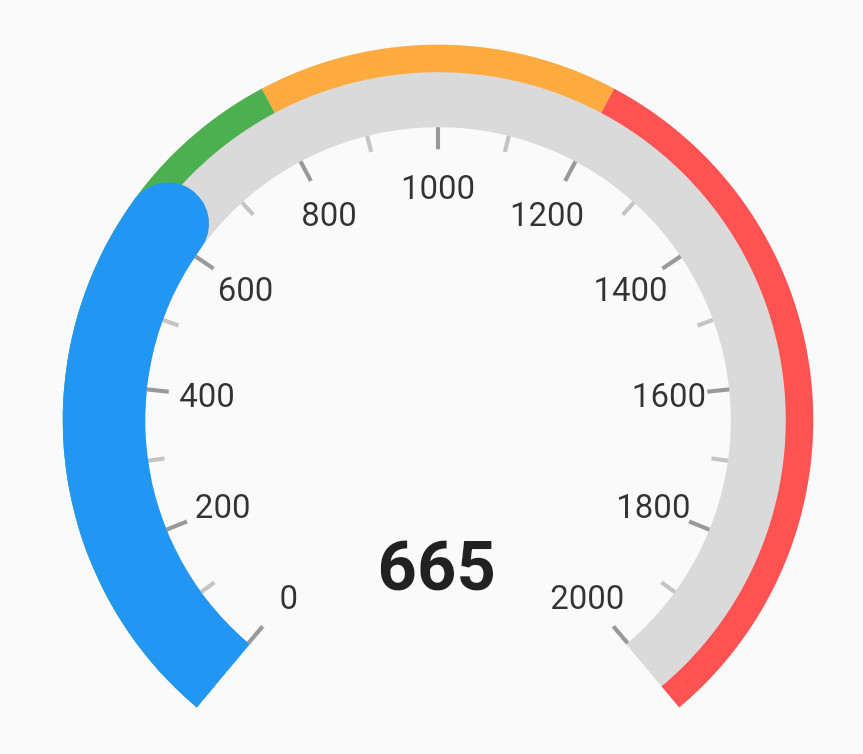
こんなゲージを追加します。
1. パッケージをインストールする
いつものように、syncfusion_flutter_gauges パッケージをインストールしましょう。しかし、今回は、pub get コマンドの代わりに、pub add コマンドを使ってみます。前回作成した iBeacon のプロジェクトのディレクトリに移動してから、以下のコマンドを実行します。
flutter pub add syncfusion_flutter_gauges
すると、これまで pubspec.yaml を編集してから pub get していたパッケージが、最新版が自動的にインストールされ、pubspec.yaml にも追加されます。
dependencies:
  flutter:
    sdk: flutter


  # The following adds the Cupertino Icons font to your application.
  # Use with the CupertinoIcons class for iOS style icons.
  cupertino_icons: ^1.0.2
  flutter_blue_beacon: ^0.0.2
  flutter_blue: ^0.5.0
  syncfusion_flutter_gauges: ^19.1.63
2. ソースコードを修正する
修正箇所は大きく分けて、三箇所ほどです。ひとつは、import に syncfusion_flutter_gauges を追加することと、Widget build() メソッドに、ゲージ Widget の追加、そして、setState() に現在の測定値と、針の色情報を追加することです。
import 'package:syncfusion_flutter_gauges/gauges.dart';
・
・
・
class _MyHomePageState extends State<MyHomePage> {
  double _counter = 0;
  Color c = Colors.blue;
  String message = 'starting...';
import でパッケージを読み込んで、針の色情報である "c" を初期値「青」で宣言しておきます。測定値は、プロジェクトが作成された時に自動的に生成されたサンプルコードにある "_counter" を使用してしまいます。ここでは、"0" で初期化しました。
追加する Widget は、このように始まります。
body: OrientationBuilder(
  builder: (context, orientation) {
    return GridView.count(
          // Create a grid with 2 columns in portrait mode, or 3 columns in
          // landscape mode.
          crossAxisCount: orientation == Orientation.portrait ? 1 : 2,
          //mainAxisSpacing: 20,
          childAspectRatio: 1.2,
今回は、画面を横にした際(Landscape mode)も考慮しているので、レイアウトは Center() と Column() ではなく、OrientationBuilder() と GridView() を使用します。これまで Center と Column() で書いていた部分を、こちらに置き換えます。OrientationBuilder() と GridView() を組み合わせると、画面が縦(Portrait mode)の際と、横の際とで変更することができます。このコードでは、"crossAxisCount:" の部分で指定していますが、"orientation == Orientation.portrait ? 1:2" とすることで、縦の時は一列、それ以外(横)の時はニ列になります。
GridView() は Widgets をグリッド状、つまり、升目状に配置するレイアウトです。写真などを画面に並べる際によく見かけるレイアウトです。そして、このレイアウトで画面が縦の時は一列、横の時は二列にします。また、"childAspectRatio:1.2" として、マス目の縦横比を 1.2、つまり、横長の長方形にしています。
      children: <Widget>[
        Container(
            decoration: BoxDecoration(
              borderRadius: BorderRadius.circular(8),
            ),
            margin: EdgeInsets.only(top: 40),
            child:SfRadialGauge(
                axes: <RadialAxis>[
                  RadialAxis(minimum: 0, maximum: 2000,
                      ranges: <GaugeRange>[
                        GaugeRange(startValue: 0, endValue: 800, color:Colors.green),
                        GaugeRange(startValue: 800,endValue: 1200,color: Colors.orangeAccent),
                        GaugeRange(startValue: 1200,endValue: 2000,color: Colors.redAccent)],
                      axisLineStyle: AxisLineStyle(thickness: 30),
                      pointers: <GaugePointer>[RangePointer(value: _counter,
                          width: 30, color: c,
                          enableAnimation: true,
                          cornerStyle: CornerStyle.endCurve)],
                      annotations: <GaugeAnnotation>[
                        GaugeAnnotation(widget: Container(child:
                        Text("${_counter.toInt()}",
                            style: TextStyle(fontSize: 25,fontWeight: FontWeight.bold))),
                            angle: 90, positionFactor: 0.5
                        )]
                  )
        ])
        ),
レイアウトを指定したので、次に、Widget を配置します。GridView() の子Widget を "children[]" で複数指定していきます。 Container() で囲まれた SfRadialGauge() というのが、今回追加しているゲージ Widget です。
"RadialAxis(minimum: 0, maximum: 2000" で、ゲージの最小値と最大値、"GaugeRange(startValue: 0, endValue: 800, color: Colors.green)" で、ゲージの目盛り 0〜800 までの色を指定しています。figure 01 と見比べると一目瞭然ですが、0〜800までは、緑色のゲージになります。同じように、800〜1200、1200〜2000 までの色も指定します。
"axisLinesStyle: AxisLinesStyle(thickness: 30)" とすることで、ゲージの太さを 30 にしています。
"pointers:" という部分が、針です。針の種類に "RangePointer" を使用し、測定値を "_counter" 変数に入れて指定します。"with: 30" は、針の太さが 30、"color: c" というのは、針の色です。針の色は、ゲージの色に合わせて変化するように変数 "c" に入れて setState() 内で設定します。
"enableAnimation: true" は、ゲージが動くことを許可し、"cornerStyle: CornerStyle.endCurve" とすることで、針の形状に丸みを付けています。
"annotations:" では、ゲージ中央に表示する数値を Text() Widget に入れて設定しています。そう、とれと Container() の "margin: EdgeInsets.only(top: 40)" では、上に 40 の余白を追加しています。
これで、figure 01 のゲージが表示されます。後は、測定値が更新された際に再描画されるように setState() 内で変化した値を設定するだけです。
setState(() {

  if(co2 <= 800){
    c = Colors.blue;
  }else if(co2 <= 1200){
    c = Colors.yellow;
  }else{
    c = Colors.red;
  }

  _counter = co2;
  beacons[beacon.hash] = beacon;
});
先程、針の色を、ゲージの色に合わせて変化させると書いた通り、"co2" の値によって、青〜黄色〜赤と、針の色も変更します。"_counter = co2" は、針の値です。
以下に全コードを示します。
import 'package:flutter/material.dart';

import 'dart:async';
import 'package:flutter_blue/flutter_blue.dart';
import 'package:flutter_blue_beacon/flutter_blue_beacon.dart';
import 'package:syncfusion_flutter_gauges/gauges.dart';

void main() {
  runApp(MyApp());
}

class MyApp extends StatelessWidget {
  // This widget is the root of your application.
  @override
  Widget build(BuildContext context) {
    return MaterialApp(
      title: '二酸化炭素濃度 Beacon',
      theme: ThemeData(
        // This is the theme of your application.
        //
        // Try running your application with "flutter run". You'll see the
        // application has a blue toolbar. Then, without quitting the app, try
        // changing the primarySwatch below to Colors.green and then invoke
        // "hot reload" (press "r" in the console where you ran "flutter run",
        // or simply save your changes to "hot reload" in a Flutter IDE).
        // Notice that the counter didn't reset back to zero; the application
        // is not restarted.
        primarySwatch: Colors.blue,
      ),
      home: MyHomePage(title: '二酸化炭素濃度 Beacon'),
    );
  }
}

class MyHomePage extends StatefulWidget {
  MyHomePage({Key key, this.title}) : super(key: key);

  // This widget is the home page of your application. It is stateful, meaning
  // that it has a State object (defined below) that contains fields that affect
  // how it looks.

  // This class is the configuration for the state. It holds the values (in this
  // case the title) provided by the parent (in this case the App widget) and
  // used by the build method of the State. Fields in a Widget subclass are
  // always marked "final".

  final String title;

  @override
  _MyHomePageState createState() => _MyHomePageState();
}

class _MyHomePageState extends State<MyHomePage> {
  double _counter = 0;
  Color c = Colors.blue;
  String message = 'starting...';

  FlutterBlueBeacon flutterBlueBeacon = FlutterBlueBeacon.instance;
  FlutterBlue _flutterBlue = FlutterBlue.instance;
  IBeacon iBeacon;

  StreamSubscription _scanSubscription;
  Map<int, Beacon> beacons = new Map();
  bool isScanning = false;

  StreamSubscription _stateSubscription;
  BluetoothState state = BluetoothState.unknown;

  @override
  void initState() {

    super.initState();

    _flutterBlue.state.then((s) {
      setState(() {
        state = s;
      });
    });

    _stateSubscription = _flutterBlue.onStateChanged().listen((s) {
      setState(() {
        state = s;
      });
    });

    _startScan();
  }

  _startScan() {
    IBeacon ib;
    double temp;
    double pres;
    double dist;
    double co2;

    print("Scanning now");
    _scanSubscription = flutterBlueBeacon
        .scan()
        .listen((beacon) {
      print('localName: ${beacon.scanResult.advertisementData.localName}');
      print('manufacturerData: ${beacon.scanResult.advertisementData.manufacturerData}');
      print('serviceData: ${beacon.scanResult.advertisementData.serviceData}');
      print('tx: ${beacon.tx}');
      print('rssi: ${beacon.rssi}');
      print('distance: ${beacon.distance}');

      ib = beacon;

      if(ib.uuid == "df19e9a46f0d4c4aa104e7ddd31a4ab5") {
        print('uuid: ${ib.uuid}');
        print('major: ${ib.major}');
        print('minor: ${ib.minor}');
        print('rssi: ${ib.rssi}');
        print('distance: ${ib.distance}');

        temp = (ib.major).toDouble();
        co2 = (ib.minor).toDouble();
        dist = (ib.distance * 1000).toInt() / 1000;

        message = "CO₂濃度:${co2.toInt()} [ppm]\n気温:${temp.toInt()} [℃]\n距離:${dist} [m]";
      }

      setState(() {

        if(co2 <= 800){
          c = Colors.blue;
        }else if(co2 <= 1200){
          c = Colors.yellow;
        }else{
          c = Colors.red;
        }

        _counter = co2;
        beacons[beacon.hash] = beacon;
      });
    });

  }

  @override
  Widget build(BuildContext context) {
    // This method is rerun every time setState is called, for instance as done
    // by the _incrementCounter method above.
    //
    // The Flutter framework has been optimized to make rerunning build methods
    // fast, so that you can just rebuild anything that needs updating rather
    // than having to individually change instances of widgets.
    return Scaffold(
      appBar: AppBar(
        // Here we take the value from the MyHomePage object that was created by
        // the App.build method, and use it to set our appbar title.
        title: Text(widget.title),
      ),
      body: OrientationBuilder(
        builder: (context, orientation) {
          return GridView.count(
                // Create a grid with 2 columns in portrait mode, or 3 columns in
                // landscape mode.
                crossAxisCount: orientation == Orientation.portrait ? 1 : 2,
                childAspectRatio: 1.2,
            children: <Widget>[
              Container(
                  decoration: BoxDecoration(
                    borderRadius: BorderRadius.circular(8),
                  ),
                  margin: EdgeInsets.only(top: 40),
                  child:SfRadialGauge(
                      axes: <RadialAxis>[
                        RadialAxis(minimum: 0, maximum: 2000,
                            ranges: <GaugeRange>[
                              GaugeRange(startValue: 0, endValue: 800, color:Colors.green),
                              GaugeRange(startValue: 800,endValue: 1200,color: Colors.orangeAccent),
                              GaugeRange(startValue: 1200,endValue: 2000,color: Colors.redAccent)],
                            axisLineStyle: AxisLineStyle(thickness: 30),
                            pointers: <GaugePointer>[RangePointer(value: _counter,
                                width: 30, color: c,
                                enableAnimation: true,
                                cornerStyle: CornerStyle.endCurve)],
                            annotations: <GaugeAnnotation>[
                              GaugeAnnotation(widget: Container(child:
                              Text("${_counter.toInt()}",
                                  style: TextStyle(fontSize: 25,fontWeight: FontWeight.bold))),
                                  angle: 90, positionFactor: 0.5
                              )]
                        )
                   ])
              ),

              Center(child:Container(
                decoration: BoxDecoration(
                  border: Border.all(color: Colors.green, width: 2),
                  borderRadius: BorderRadius.circular(8),
                ),
                padding: EdgeInsets.all(8),
                margin: EdgeInsets.only(bottom: 60),
                child: Text(
                  message,
                  style: Theme.of(context).textTheme.headline4,
                ),
              )),
            ],
          );
        }
      )
    );
  }
}
基本的に、ゲージの Widget を追加しただけです。それでは、実行してみましょう。
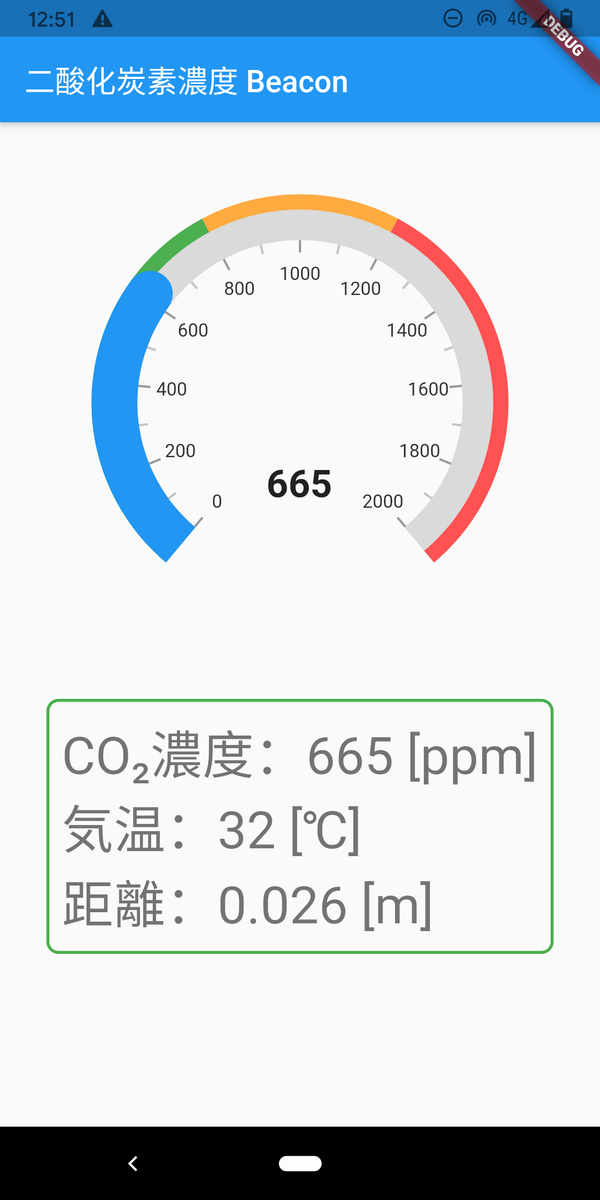
上手く表示できたでしょうか。今回は、OrientationBuilder() を使用しているので、横向きもあります。

これは、数値が高い場合の表示となっており、針の色も変わっていることが確認できます。
以上